


Difficulté
Difficile
Étapes
15
Temps nécessaire
03:00:00
- Remplacer le cardan sur Renault Clio 2 15 étapes

Ce tutoriel a été créé par la communauté
User contributed
Introduction
Changement d'un cardan sur une clio 2 1.5DCI 65ch 3portes.
-
-
Avant de commencer les opérations, il faut caler le véhicule sur les 3 autres roues.
-
Ici, nous allons nous occuper du cardan gauche, coté boite, mais les opérations sont les mêmes pour le cardan droit
-
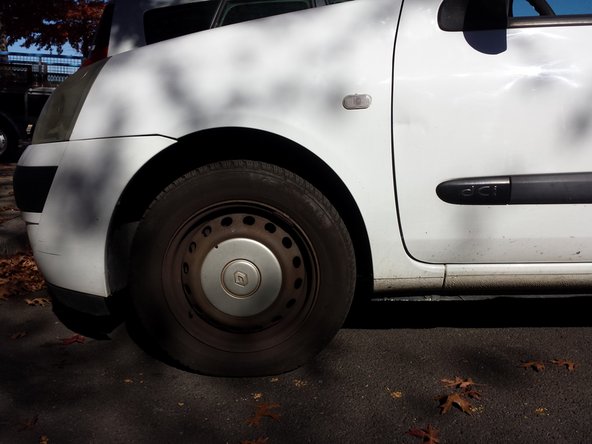
Tout d'abord, se mettre sur un sol plat, caler les roue, puis dévisser un petit peu les 4 boulons de la roue (clé de 19).
-
Ensuite, soulever la voiture avec un cric puis mettre une chandelle.
-
Enfin, finissez de dévisser les boulons pour enlever la roue.
-
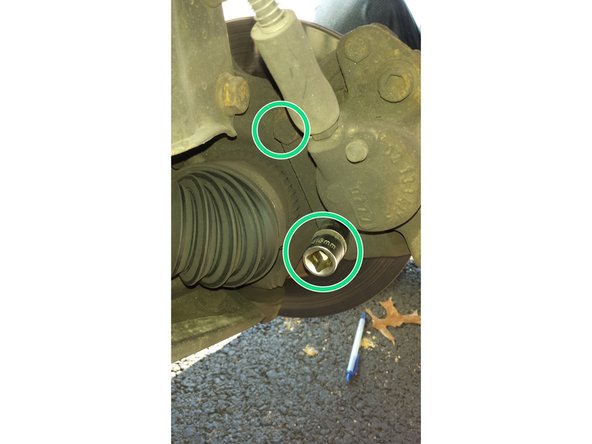
A cette étape, on peut déjà voir l'écrou de transmission (il peut y avoir un cache dessus, dans ce cas l'enlever avec un tournevis, le cache est juste emboité)
-
-
-
Peut importe les opérations que vous faites sur votre voiture, ayez toujours votre revue technique avec vous.
-
Les couples de serrage sont donné pour une clio 1.5DCI 65ch, CTTE 3 portes. Se reporter à votre RTA pour avoir les bons couples.
-
Faites toujours attention de bien caler la voiture, avec des buches, des roues, des chandelles.
-
Lors de changement du cardan, vérifier bien que c'est exactement le meme.
-
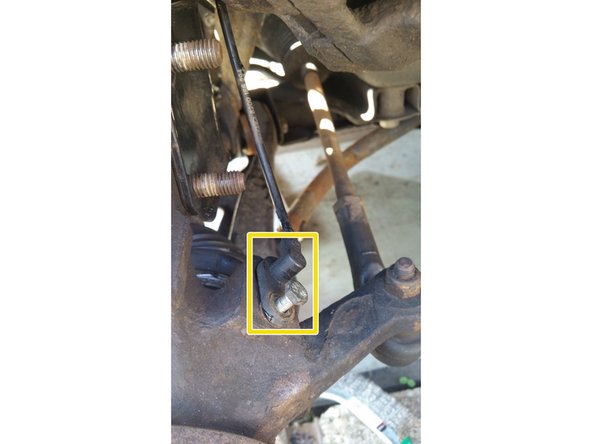
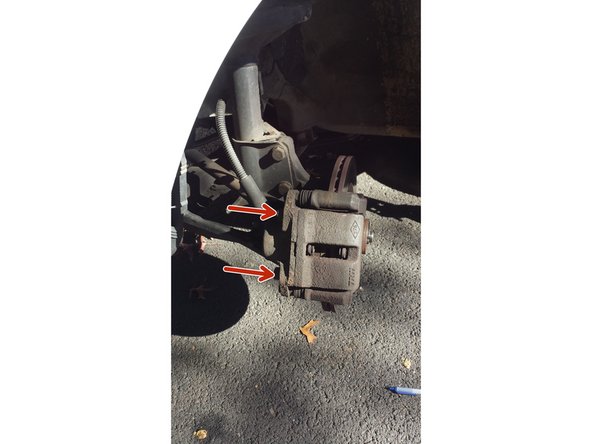
Je vous met une photo récapitulatif des éléments que nous allons voir.
-
-
-
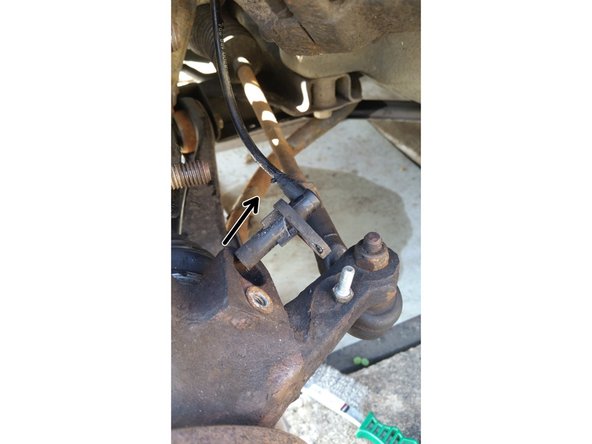
Le capteur d'ABS est juste tenu par une vis qu'il faut enlever (clé de 10).
-
Ensuite, il faut simplement le faire un peu bouger pour pouvoir l'enlever de son logement.
-
Une fois enlever, le faire tenir par un bout de fil de fer dans le ressort de l'amortisseur pour ne pas qu'il nous gene par la suite.
-
-
-
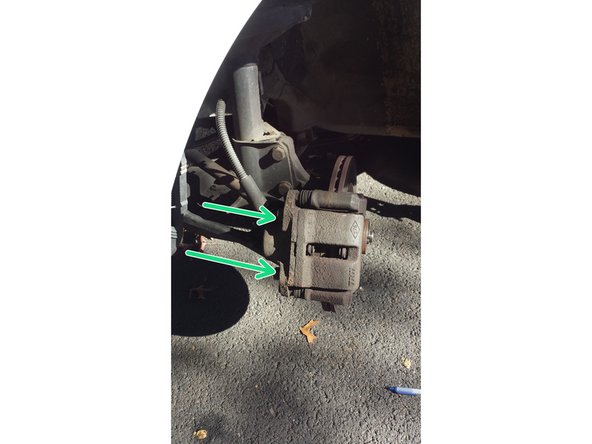
Pour enlever l'étrier, il faut dévisser les vis de fixation du support d'étrier qui se trouve derrière le disque.
-
Les vis peuvent être un peu dure car ce sont des vis freinées. Il faut une clé de 18.
-
Une fois les vis enlevées, vous pouvez retirer l'étrier et le suspendre avec un bout de fil de fer sur le ressort afin qu'il ne vous gene pas pour la suite des opérations. Attention de ne pas abimer le flexible de frein.
-
Si l'étrier est difficile à enlever, vous pouvez écartez un peu les plaquettes (cela aura pour effet de faire rentrer le piston). ATTENTION a ne pas endommager le disque.
-
-
-
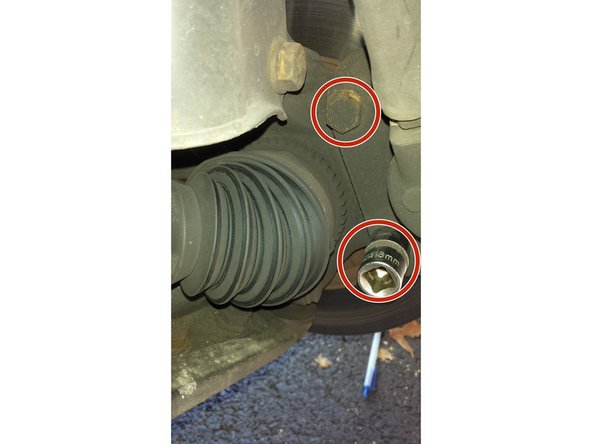
Une fois la roue enlevée, il faut dévisser l'écrou de transmission ( sous le cache)
-
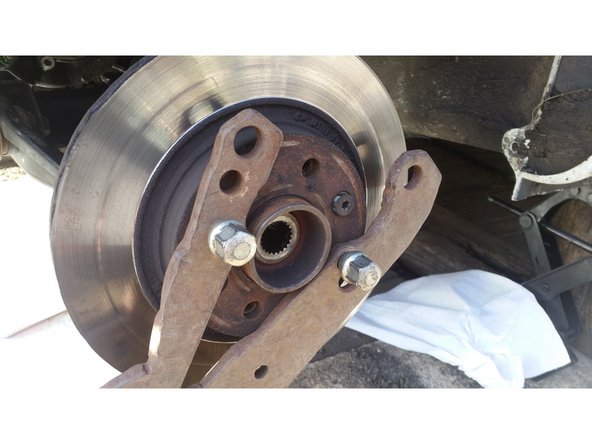
Pour cela il vous faudra une clé de 30, et trouver un outils (ou le fabriquer) qui vous permettra d'immobiliser le moyeu pour que vous puissez dévisser l'écrou. Attention à ce que l'écrou ne force pas sur la transmission lorsque vous essayez de le dévisser !
-
L'outils fabriqué permet de dévisser l'écrou sans forcer sur la transmission puisque il est pris dans les écrous de roue et sur le sol.
-
REMARQUE: Garder l'écrou mais il est normalement fournit avec votre futur nouveau cardan.
-
-
-
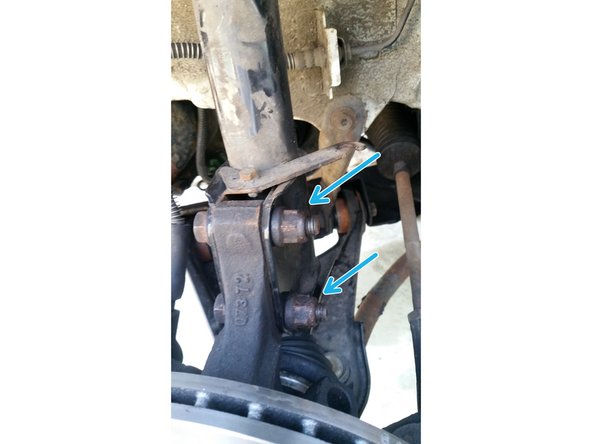
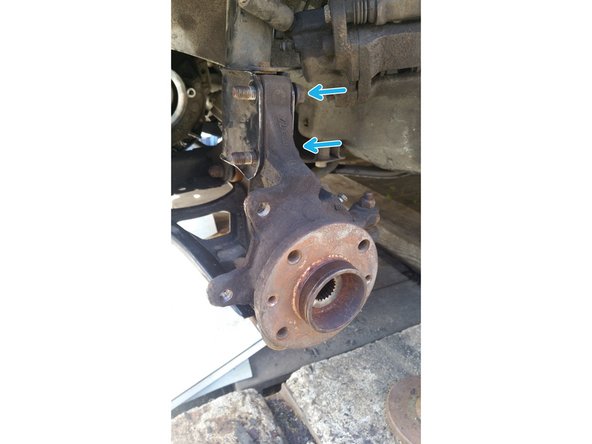
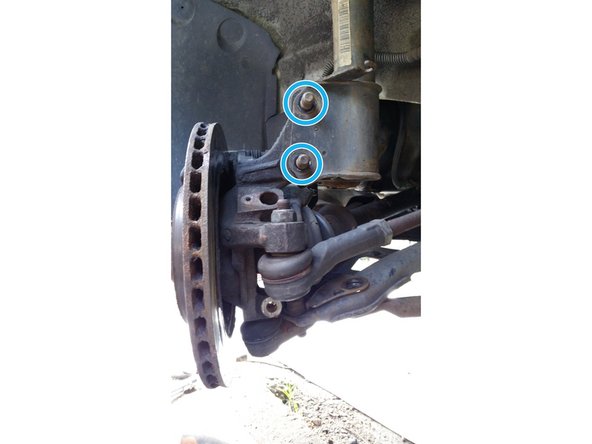
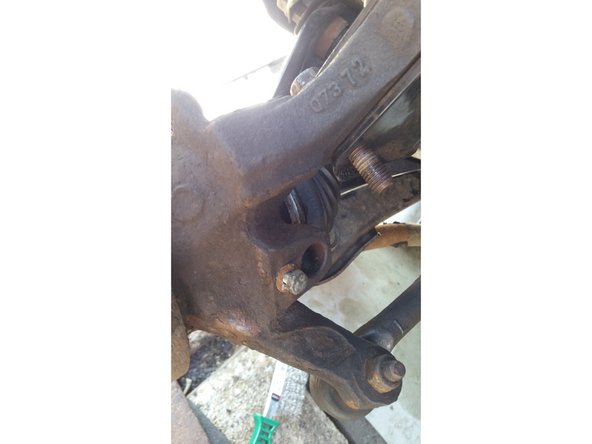
Il faut maintenant désacoupler l'amortisseur du pivot.
-
Pour cela, dévisser les 2 vis. Il faut des clés de 18.
-
Ici les vis sont autofreinées donc elles peuvent être un peu difficile à enlever
-
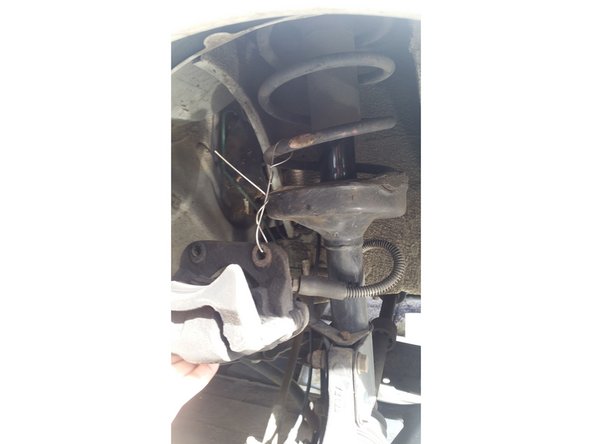
Une fois les vis enlever, basculer le pivot vers vous et la jambe d'amortisseur vers l'arrière.
-
ATTENTION: faites attention que le bas de la jambe d'amortisseur ne touche pas le soufflet du cardan une fois que vous l'enleverez !
-
Remarque: la jambe de suspension est toujours maintenue par sa partie supérieur (car retenu par la coupelle d'amortisseur) donc il ne tombera pas.
-
Remarque: Le pivot est encore maintenue par le cardan donc il ne basculera pas completement mais sera assez "lache" donc attention lorsque vous l'enlevez.
-
Sur la dernière photo, on voit que la partie inférieur de la jambe d'amortisseur est enlevé du pivot. ici le cardan avait déjà été enlevé pour montrer qu'elle ne tombe pas.
-
-
-
Maintenant que l'on peut enlever le cardan coté roue, il faut dévisser les vis coté boite.
-
Il n'y a rien de compliqué à dévisser les 3 vis coté boite, si ce n'est qu'il faut se méfier car de l'huile peut couler si vous enlever le cardan coté boite.
-
Pour le cardan droit, il n'y a pas de vis, le cardan est juste inseré dans le bloc moteur.
-
Remarque: Sur certaines clio, il se peut que vous ailler un clip coté droit, se reporter à votre RTA pour savoir si vous êtes concernés.
-
-
-
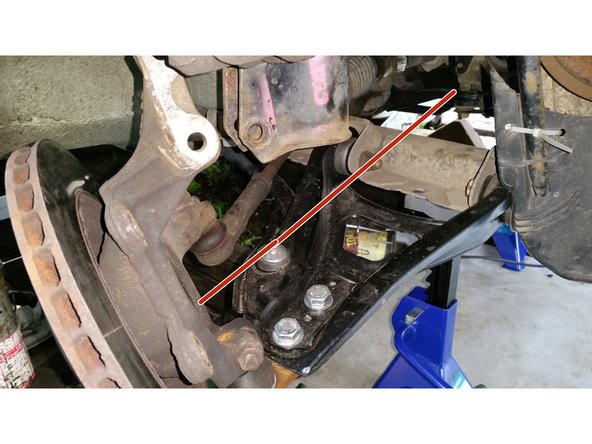
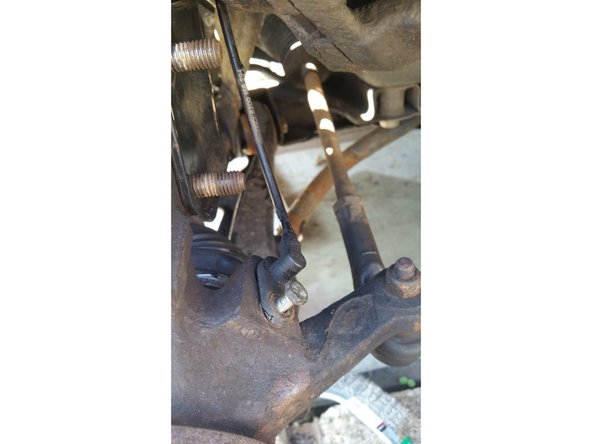
Pour enlever le cardan coté roue, il faut tourner le volant complètement à droite (ou à gauche suivant le cardan que vous êtes en train d'enlever), puis baisser un peu le pivot (le moyeu). Sur la photo, le cardan est enlevé du moyeu. Les fleches rouges et noires vous indiquent dans quels sens tirer/pousser pour dégager le cardan du moyeu.
-
Rappel: Comme nous avons enlever les vis coté boite, il suffit juste de retirer le cardan doucement.
-
Attention, il peut y avoir un petit peu d'huile coté boite, mais trés peu.
-
Sur la dernière photo, la ligne rouge indique où le cardan était.
-
-
-
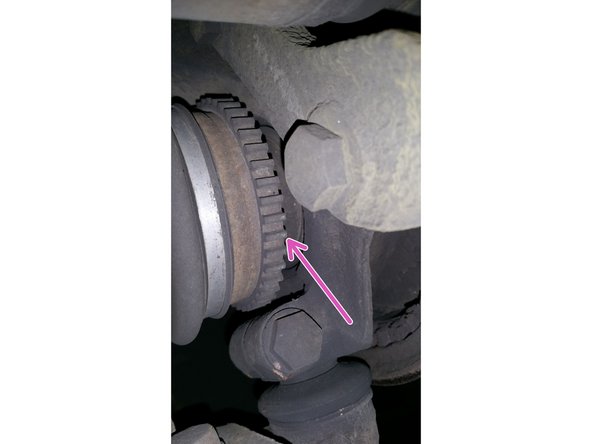
Une fois que vous avez enlevé le cardan, vérifier que le nouveau que vous avez acheté est bien le même:
-
1- Vérifier qu'il y a bien le meme nombre de canelures
-
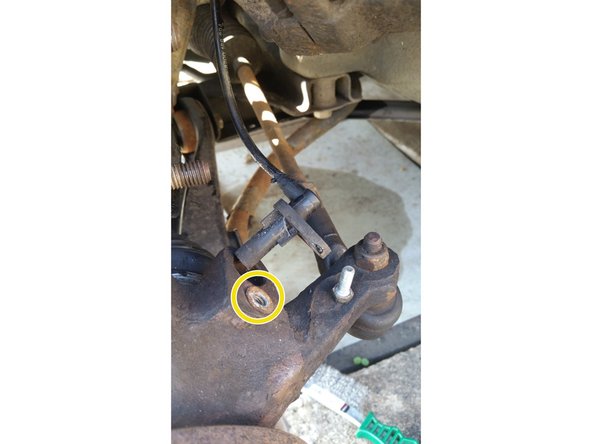
2- Vérifier qu'il y a bien la bague abs, en 22 ou 44 dents suivant votre voiture (flèche rouge sur les photos)
-
3- vérifier éventuellement que les caoutchouc soient bons.
-
4- Vérifier la longueur du cardan
-
Si tout est bon, vous pouvez mettre le nouveau cardan en place.
-
-
-
Insérer le cardan coté boite et remettre les 3 vis (ou insérer le simplement coté droit)
-
De la même manière que vous avez enlevé le cardan coté roue en pivotant le moyeu vers le bas et en tournant le volant à droite (ou a gauche), refaire la meme opération mais cette fois en insérant les cannelures du nouveau cardan dans le moyeu.
-
Quand le cardan sera mis dans le moyeu, vous le verrez sortir de 1 ou 2 centimètres
-
Remarque: Il n'est pas utile de forcer, si cela ne rentre pas, c'est qu'il y a un problème quelques part ! La seule sur laquelle vous pouvez jouer est de faire tourner le moyeu pour que les cannelures soient bien en face. Si cela ne suffit pas, alors sortez le cardan et vérifier les cotes.
-
-
-
Remettre les vis de l'amortisseur inférieur dans le pivot (clé de 18)
-
ATTENTION: Les têtes de vis sont vers l'intérieur de la voiture
-
Ensuite serrer les boulon ( à 10.5 pour ma clio)
-
-
-
Remettre l'écrou de direction qui est fourni avec le nouveau cardan.
-
Remettre en place l'outil pour bloquer le pivot.
-
Visser l'écrou à 28 (se reporter à votre RTA si ce n'est pas la meme clio).
-
Remettre le cache sur l'écrou si vous en aviez un.
-
-
-
Remettre l'étrier sur le disque
-
Remettre les deux vis avec du frein filet et les serrer à 4 (clé de 18)
-
Comme nous n'avons pas ouvert le circuit de frein, il n'y a pas de purge à faire.
-
-
-
On remet le capteur d'ABS en reserrant simplement la vis sans forcer "comme une brute" (clé de 10)
-
-
-
Revisser les écrous de roue.
-
Enlever le cric.
-
Serrer les écrous à 9
-
Remettre l'enjoliveur et enlever les cales sur les autres roues.
-


Annulation : je n'ai pas terminé ce tutoriel.
3 autres ont terminé cette réparation.
15 commentaires
Bonjour
Sur la RTA de Renault, il est préconisé de graisser les cannelures côté boite de vitesses et de mettre un produit de scellement côté roue. Vous avez monté les éléments à nu ? Cdt
Philippe BERG - Résolu à la publication Réponse
Bonjour,
je viens de réaliser l’opération, il n’est pas nécessaire de démonter l’étrier de frein ni le capteur abs, éventuellement débrancher celui-ci pour avoir de l’espace. Je préfère défaire également la rotule de direction pour avoir plus de marge pour manœuvrer et extraire le cardan. Mais il faut un arraché rotule. On peut aussi défaire l’écrou du cardan à la clé à choc (une bonne si l’écrou est grippé mais ça vient et quel gain de temps).
Une demi heure pour le démontage, vidange de boîte comprise (je pensais qu’il fallait absolument vidanger pour faire le cardan gauche). Même temps pour le remontage. + le temps pour mettre en place et ranger.
Pour le nombre de dents… pas le choix que de démonter le cardan pour les compter je pense. Si pas le même nombre, le compteur de vitesse et km sera faut et surtout plus d’ABS sur la roue concernée avec défaut au tableau de bord.
Bonne mécanique
benoit
Benoît Roseau - Résolu à la publication Réponse
Salut Benoit,
je démonte l’étrier pour pouvoir aisement faire tourner à fond la roue à droite ou à gauche, puis de baisser le pivot pour enlever le cardan, sans avoir à enlever la rotule de direction.
Pour ma part, je trouve ça plus chiant d’enlever la rotule ^^ (en fait pour moi l’arrache rotule est en biais et rippe souvent …!)
Et puis une fois les freins enlevés et suspendus, on est sur de ne pas les abimé dans la manipulation.
La clé à choc oui c’est bien je confirme! Mais souvent je prends ce qui est déjà sortie de boite lol
Pour la vidange oui, pas besoin de la faire pour les deux cardans !
Les clio, c’est cool a démonter ;)
Bonjour, bon tuto, juste une petite proposition: essayez de desserrer légèrement l’écrou de transmission avant de soulever la voiture et en appuyant sur le frein à pied. une fois soulevé et lors du démontage vous cherchez quelqu’un qui appuiera sur le frein à pied pendant l’enlevement total de l’écrou.
(même procédure lors du montage)
vous gagnerais du temps et vous économiserais les efforts.
PS: 3 heures c’est un peu trop , à mon avis 1 heures est le max. 2h pour un débutant (ou moins)
amicalement
reda boulma - Résolu à la publication Réponse
De plus, théoriquement l’écrou est à changer à chaque fois qu’il est enlevé … du coup mettre du frein filet lors de la repose de l’écrou.
Pour ce qui est du remontage idem, ne surtout pas utiliser les freins !!!
De plus, si l’on fait avec cette méthode, on a aussi beaucoup plus de changer dévisser l’écrou en donnant une force latéral si l’on appuye sur le frein lorsque la roue est en l’air, et je pense que l’écrou et les freins ne sont pas vraiment prévu pour ce type de force ..
Toujours avec l’outil, regarder à combien il faut serrer (normalement 26-28kg), puis mettre une rallonge sur la douille, et se positionner sur la rallonge en fonction de son poids.
Par exemple, avec une rallonge de 50cm, et avec un poids de 54kg si on pèse 54kg, on obtient bien 54/2=27kg si on se met debout au bout des 50cm.
A adapter avec son poids évidemment ^^
Amicalement
ps: Idem pour ce qui est d’appuyer sur le frein, il ne faut également pas le faire lorsque vous voulez bloquer le volant !!! Vous abimerez les freins/disques !!