Parts
-
-
Commencez par débrancher la cosse négative de votre batterie
-
Dévissez les 6 vis puis retirez le filtre.
-
-
-
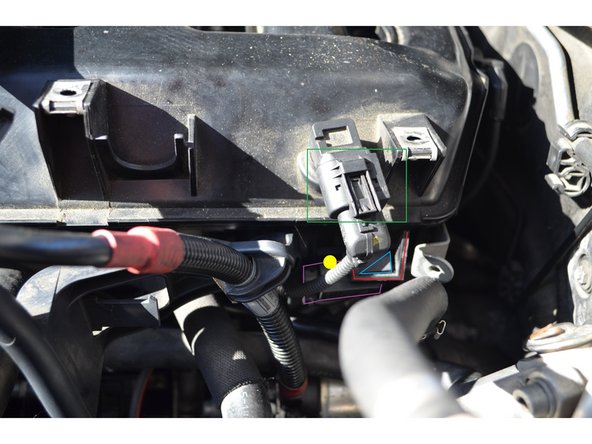
Il faut extraire le capteur AUC en le faisant tourner d'1/4 de tour (carré vert).
-
On retire ensuite le câble (trait jaune) en tirant dessus, il est fixé par 3 agrafes (carré bleu).
-
On dévisse maintenant les 2 vis (entourées en rouge) qui maintiennent le tablier.
-
Sortir le tablier en tirant dessus.
-
-
-
On retire le joint.
-
On retire le cache de la vis supérieure . Il faut une douille torx E18 pour la vis.
-
On retire les 2 autres vis torx. Il faut une douille torx E16.
-
On peut retirer les 2 barres anti-rapprochement en tirant dessus.
-
-
-
On commence par retirer la chape en dévissant les 3 vis puis on l'enlève.
-
On retire le cache acoustique en dévissant les 2 vis puis on l'enlève.
-
-
-
Débranchez le palpeur de pression.
-
Il faut maintenant retirer le convertisseur de pression du collecteur d'admission. Le convertisseur de pression (entouré en mauve) est fixé sur l'agrafe du collecteur (en rouge). Il suffit de poussé la petite patte de fixation (en bleu).
-
Un petit tuyau de dépression est relié au convertisseur de pression ET au collecteur, il faut donc l'extraire au niveau du convertisseur (en jaune).
-
-
-
On retire le tuyau de dépression.
-
On débranche le boîtier de connection.
-
On retire l'agrafe de la gaine électrique.
-
On retire l'agrafe qui retient la durite puis on sort la durite. Sur la photo la durite est déjà déboîtée.
-
-
-
On dévisse les 12 vis avec une douille de 10.
-
On dévisse les 7 écrous avec une douille de 11.
-
On retire le collecteur.
-
-
-
Il y a en un par bougie, il faut appuyer de chaque côté de la tête du faisceau puis tirer vers le haut pour le sortir de la bougie.
-
On dévisse ensuite chaque bougie avec une longue douille de 10.
-
-
-
Pour remonter les bougies on peut appliquer un peu de graisse au cuivre sur le filetage.
-
Tout le reste s'effectue en sens inverse du démontage.
-
Annulation : je n'ai pas terminé ce tutoriel.
11 autres ont terminé cette réparation.
21 commentaires
Bonjour, je suis bloqué à l’étape 5 je n’arrive pas à retirer la chape j’ai dévisser mais après il faut tirer fort ? Avez vous une technique ça sort pas chez moi :-(
merci
En fait pour retirer le pommeau il faut se mettre en drive avant, pour le remettre, pas d’importance.
Bonjour Laurent,
En fait il est juste collé. Il suffit de tirer vers le haut comme on arracherait une grosse carotte!
Avec le pommeau, une tige en plastique de 15 cm vient avec. Cela n’avait l’air solide mais la pose n’a pas pose de soucis.
@+
Pour info, jvais passer de la 525d à la 525xi :)
Christophe
Bonjour Christophe,
Je n’ai jamais démonter le pommeau, désolé.
Cordialement
Laurent


