Introduction
Il est impératif d’être deux pour réaliser cette opération
Pièces
Vidéo d'introduction
-
-
Afin de garder votre véhicule propre, pensez à le protéger à l'aide de plusieurs grands chiffons
-
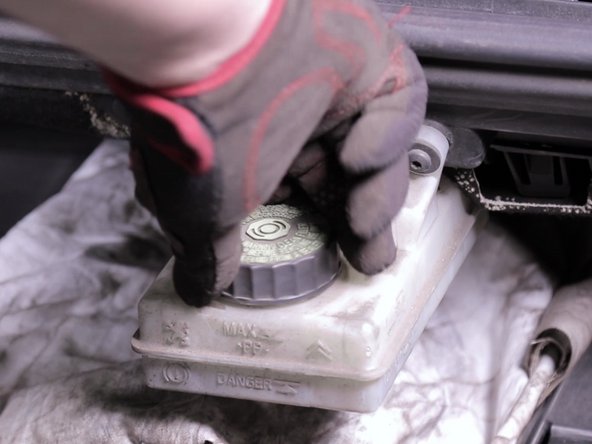
Ouvrir le bouchon du réservoir de liquide de frein
-
Insérer la seringue à huile dans le bocal, et extraire un maximum de liquide de frein
-
Vider le contenu de la seringue dans le jerrican
-
Répéter l'opération jusqu'à vider complètement le réservoir
-
-
-
A l'aide d'un tournevis plat retirer le filtre du bocal
-
Refermer le bouchon du bocal et dévisser les 2 vis de fixation
-
A l'aide d'un petit tournevis plat, retirer la durite du bocal, en faisant attention à ne pas faire couler de liquide de frein
-
-
-
Vider le reste de liquide de frein dans le jerrican
-
Nettoyer le bocal à l'aide d'un chiffon et reconnecter la durite. Appuyer fort pour bien connecter la durite et le bocal
-
Remettre le bocal en place, insérer les 2 vis dans leur orifices et les serrer. Placer le filtre dans le goulot
-
-
-
Veiller à bien vérifier le type de liquide de frein correspond au véhicule
-
effectuer la purge dans l'ordre suivant (en débutant par la roue la plus éloigné de mètre cylindre) : Arrière droit, arrière gauche, avant droit, avant gauche
-
Retirer le bouchon de la vis de purge
-
Brancher le tuyau du bidon de purge sur la vis de purge
-
-
-
Placer le bidon de purge en hauteur, accrocher au ressort de suspension par exemple.
-
A l'aide de la clé plate, déserrer la vis de purge pour l'ouvrir
-
La personne positionnée au poste conducteur doit pomper de façon répétée sur la pédale de frein, puis rester appuyée sur la pédale pendant que la seconde personne ouvre la vis de purge. Une fois la pédale de frein au plancher la deuxième personne resserre la vis de purge.
-
Effectuer la purge jusqu’à ne plus avoir de présence de bulles d'air dans le tuyau, mais également un changement de couleur du liquide (il devient de plus en plus clair)
-
Le bidon de purge se remplit et le niveau de liquide de frein diminue dans le réservoir
-
-
-
Les étriers avant et arrière ne sont pas les même, donc la vis de purge ne sera pas au même endroit
-
Refaire un complément de liquide de frein si besoins pour arriver au bon niveau (MAX)
-
Fermer le bouchon du réservoir
-
Annulation : je n'ai pas terminé ce tutoriel.
35 autres ont terminé cette réparation.
22 commentaires
ATTENTION à la coordination des images de la vidéo qui peut laisser penser qu’on peut desserrer la vis de purge AVANT l’appui sur la pédale de frein et relâcher la pédale AVANT le serrage de la vis de purge.
Voici la bonne méthode:
1) Pomper sur la pédale puis rester en appui sur celle-ci (en position HAUTE)
2) Ouvrir la vis de purge pour laisser le LDF (et les bulles d’air éventuelles) s’écouler pendant que la pédale s’enfonce
3) Fermer la vis de purge tant que le pied est en appui sur la pédale (en position BASSE)
4) Relâcher l’appui pour laisser remonter la pédale
5) Recommencer comme au 1) jusqu’à la fin de la purge.
anne khomm - Résolu à la publication Réponse
Vous pouvez confectionner un outil de purge sans pompage. Trouver un bouchon de bocal d’occasion dans lequel vous percez un trou au centre. Son diamètre doit être d’environ 10mm pour y emboîter une valve de pneu. Remplir le bocal de liquide neuf, fermez le bouchon avec sa valve, ouvrez une vis de purge et pousser le liquide avec une pompe à vélo. Prendre garde qu’il y ait toujours du liquide neuf dans le bocal en le remplissant régulièrement, sinon vous envoyez de l’air dans le circuit et tout est à recommencer.
Je vous donne une information pour la procédure de purge de freins sur Nissan Vanette C22 , essence, qui est pratiquement impossible à trouver, même pour le propriétaires de Largo, VAN , Vanette C22, Vanette GC22 et un énorme éventail des versions.
Procédure de purge : d’abord Cylindre de roue arrière gauche. + Cylindre de roue arrière droit.
On passe a l’ AVANT sur ORIFICE B (purgeur plus proche de la terre , car il y à deux : A et B par mâchoire avant ) de mâchoire avant gauche + ORIFICE B de mâchoire AVANT droit.
Explication ici : la canalisation hydraulique de freins sur ces model Nissan sur le manuel d’atelier sont dessinés A et B ( la A en noir)
Une fois finalisé le circuit B de roue avant droit. On retourne à la roue AVANT Gauche et on purge le ORIFICE A (purgeur plus proche de la carrosserie) (car i l y à DEUX purgeurs par roue AVANT el A et le B) (le B est le plus proche de la terre)
On retourne a la roue AVANT droit et on purge le ORIFICE A .
ramon saez - Résolu à la publication Réponse
Attention de ne JAMAIS VIDER TOTALEMENT LE RÉSERVOIR DE LIQUIDE DE FREIN pendant la purge des étriers et faire l’appoint régulièrement sous peine de mettre de l’air dans le circuit, ce qui provoquerait de gros problèmes de freinage.
Pierre-Edouard BUDAN - Résolu à la publication Réponse


