


Difficulté
Modérée
Étapes
11
Temps nécessaire
02:00:00

Ce tutoriel a été créé par la communauté
User contributed
Introduction
Il sera nécessaire au préalable de lever le train avant du véhicule, retirer la roue avant gauche, et déposer la batterie.
-
-
Desserrer les 3 colliers de brides d'échappement en retirant la visserie
-
Désolidariser les 3 morceaux de la ligne d'échappement.
-
Retirer les écrous de fixation de la ligne d'échappement au niveau du montage souple intermédiaire.
-
Déposer la ligne d'échappement.
-
-
-
Retirer les clips de fixation du passage de roue avant gauche, comme repérés sur l'illustration, ainsi que les clips fixés sur le pare-choc avant.
-
Déposer le passage de roue avant gauche.
-
-
-
Retirer les vis de fixation du support de batterie, côté capot et côté passage de roue.
-
Retirer le support de batterie.
-
-
-
Retirer la tresse de masse de la boîte de vitesses. Ceci permet de faciliter l'accès à une vis de fixation du démarreur.
-
-
-
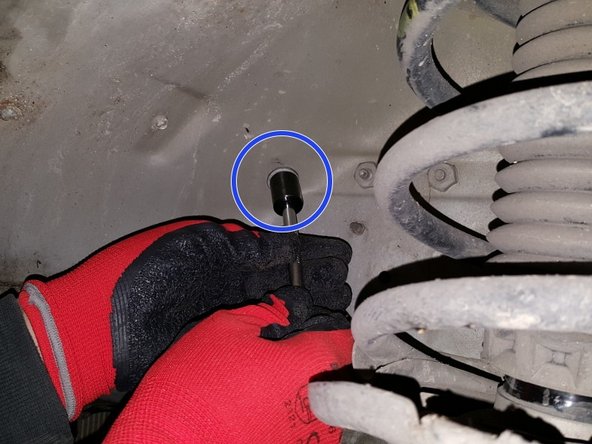
Accéder, par le logement de la batterie, à la vis de fixation du démarreur côté boîte de vitesses. Cette vis n'est pas directement visible et nécessite un accès à l'aveugle à l'aide de rallonges à douilles (BTR de 6mm)
-
Retirer la vis.
-
-
-
En accédant par dessous le véhicule, retirer les deux dernière vis de fixation du démarreur. Là encore, l'accès est limité et un empilement judicieux de rallonges est à prévoir.
-
En prenant garde à bien dégager la languette de fixation du faisceau électrique de son encoche dans le démarreur, extraire le démarreur de son logement.
-
-
-
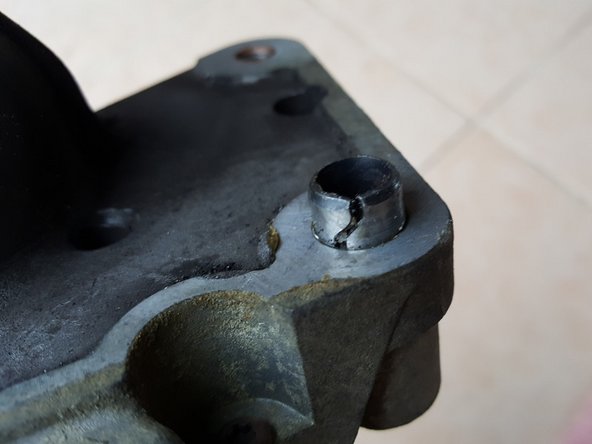
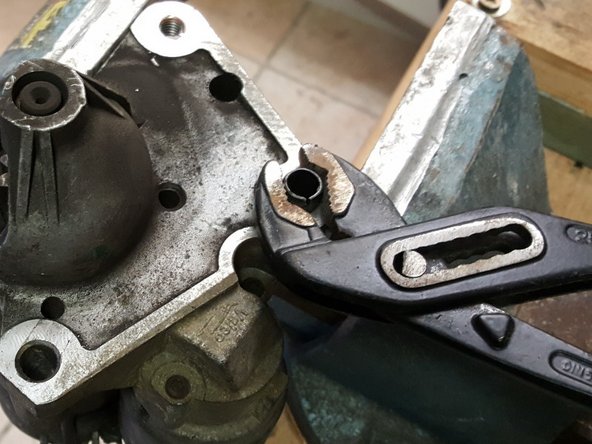
A l'aide d'une pince multiprise, retirer la douille de centrage de son alésage en la comprimant légèrement dans le sens de sa rainure.
-
Nettoyer la douille de centrage.
-
-
-
Appliquer de la graisse adaptée dans l'alésage de la douille de centrage afin de faciliter le prochain démontage (de préférence graisse au cuivre, graphite ou bisulfure de molybdène).
-
Remonter la douille de centrage sur le démarreur neuf avec la même méthode que pour l'extraction.
-
-
-
Nettoyer la surface portante du démarreur sur la boîte de vitesses, à l'aide d'une brosse et d'un chiffon.
-
Procéder au remontage de la pièce neuve, en suivant la procédure de dépose à l'envers. Le serrage des vis de fixation du démarreur s'effectue à un couple de 20N.m, avec un graissage des filets conseillé pour éviter tout grippage.
-


Annulation : je n'ai pas terminé ce tutoriel.
5 autres ont terminé cette réparation.
18 commentaires
merci
j'aurai pu la chercher longtemps cote moteur la 3eme vis
vous avez une technique pour ecarter les colliers d chappement (par exemple celui qui est dans le" tunnel " )a l arriere du conecteur tressé ???
les autres facile deux pinces ou deux tournevis et c est bon mais la je suis emmmb té
1je suis limite en hauteur de vehicule
2 je commence a vieuzer et j en ai marre de faire dessous dessus
lol
merci pour vos reponses
crdlt phil
lebonalineetphilippe@gmail.com - Résolu à la publication Réponse
Attention!!! Sur citroen berlingo 1.6L hdi
Une fois démonté par en dessous la vis que tu peux avoir avec une rallonge.
Le demarreur normalement aurait dû tombé mais il y a une patte métallique avec ressort qui m'a bien emmerdé et qui a d ailleurs cassé.
Je recherche à savoir à quoi elle sert..
Si quelqu un peut m en dire plus.
Merci d avance