


Difficulté
Modérée
Étapes
11
Temps nécessaire
02:00:00

Ce tutoriel a été créé par la communauté
User contributed
Introduction
Il sera nécessaire au préalable de lever le train avant du véhicule, retirer la roue avant gauche, et déposer la batterie.
-
-
Desserrer les 3 colliers de brides d'échappement en retirant la visserie
-
Désolidariser les 3 morceaux de la ligne d'échappement.
-
Retirer les écrous de fixation de la ligne d'échappement au niveau du montage souple intermédiaire.
-
Déposer la ligne d'échappement.
-
-
-
Retirer les clips de fixation du passage de roue avant gauche, comme repérés sur l'illustration, ainsi que les clips fixés sur le pare-choc avant.
-
Déposer le passage de roue avant gauche.
On doit démonter le Pneu gauche, pour pouvoir enlever le garde boue noir, et pouvoir avoir accès au boulon que l'on doit ouvrir pour démonter le support de la batterie. la clé utilisée est une clé pipe de 13. Il est important de graisser ce boulon extérieur lors de son serrage, une fois les réparations terminées, pour pouvoir l'ouvrir sans difficulté lors d'un entretien ultérieur. On rappelle que le support de la batterie est fixée solidement par 7 boulons au total : 6 s'ouvrent de l'intérieur et 1 seul de l'extérieur.
-
-
-
Retirer les vis de fixation du support de batterie, côté capot et côté passage de roue.
-
Retirer le support de batterie.
-
-
-
Retirer la tresse de masse de la boîte de vitesses. Ceci permet de faciliter l'accès à une vis de fixation du démarreur.
Dans même occasion peut-on change le support de boite
karan kugendrarajah - Résolu à la publication Réponse
-
-
-
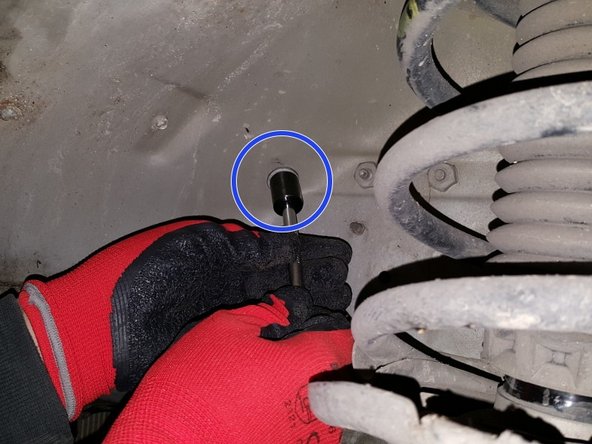
Accéder, par le logement de la batterie, à la vis de fixation du démarreur côté boîte de vitesses. Cette vis n'est pas directement visible et nécessite un accès à l'aveugle à l'aide de rallonges à douilles (BTR de 6mm)
-
Retirer la vis.
-
-
-
En accédant par dessous le véhicule, retirer les deux dernière vis de fixation du démarreur. Là encore, l'accès est limité et un empilement judicieux de rallonges est à prévoir.
-
En prenant garde à bien dégager la languette de fixation du faisceau électrique de son encoche dans le démarreur, extraire le démarreur de son logement.
-
-
-
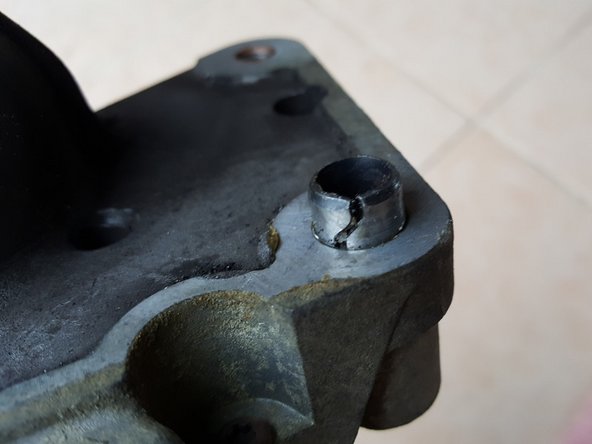
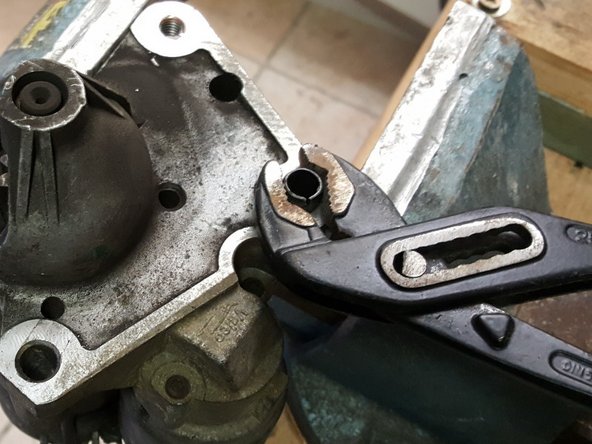
A l'aide d'une pince multiprise, retirer la douille de centrage de son alésage en la comprimant légèrement dans le sens de sa rainure.
-
Nettoyer la douille de centrage.
-
-
-
Appliquer de la graisse adaptée dans l'alésage de la douille de centrage afin de faciliter le prochain démontage (de préférence graisse au cuivre, graphite ou bisulfure de molybdène).
-
Remonter la douille de centrage sur le démarreur neuf avec la même méthode que pour l'extraction.
-
-
-
Nettoyer la surface portante du démarreur sur la boîte de vitesses, à l'aide d'une brosse et d'un chiffon.
-
Procéder au remontage de la pièce neuve, en suivant la procédure de dépose à l'envers. Le serrage des vis de fixation du démarreur s'effectue à un couple de 20N.m, avec un graissage des filets conseillé pour éviter tout grippage.
super tuto merci vous m avez fait gagner des pepettes mais pas facile a faire c est vraiment innaccesible merci peugeot
patrick guillaume - Résolu à la publication Réponse
-


Annulation : je n'ai pas terminé ce tutoriel.
5 autres ont terminé cette réparation.
18 commentaires
merci
j'aurai pu la chercher longtemps cote moteur la 3eme vis
vous avez une technique pour ecarter les colliers d chappement (par exemple celui qui est dans le" tunnel " )a l arriere du conecteur tressé ???
les autres facile deux pinces ou deux tournevis et c est bon mais la je suis emmmb té
1je suis limite en hauteur de vehicule
2 je commence a vieuzer et j en ai marre de faire dessous dessus
lol
merci pour vos reponses
crdlt phil
lebonalineetphilippe@gmail.com - Résolu à la publication Réponse
Attention!!! Sur citroen berlingo 1.6L hdi
Une fois démonté par en dessous la vis que tu peux avoir avec une rallonge.
Le demarreur normalement aurait dû tombé mais il y a une patte métallique avec ressort qui m'a bien emmerdé et qui a d ailleurs cassé.
Je recherche à savoir à quoi elle sert..
Si quelqu un peut m en dire plus.
Merci d avance
Je me suis servi de ce tuto pour démonter le démarreur d’une 307 1,6l HDI de 2006.
Pour la 307 en plus du démontage indiqué, je préconise de déposer la partie basse du pare-brise ainsi que le filtre à air et son boîtier complet, ce qui facilite l’accès et la visibilité par le dessus. De plus sur le démarreur de la 307, il y a un faisceau qui est fixé par une vis qu’il faut retirer par le dessus avec l’aide d’une personne qui présente le démarreur dans la bonne position par le dessous.
pascalschneider610 - Résolu à la publication Réponse
bonjour mon véhicule est un berlingo 1,9 d 70 cv de 2004 es que c’est la meme procédure ???
septdetable - Résolu à la publication Réponse
Un tout grand merci,
Super tuto.
Perso, je n'ai pas démonté l'échappement, juste les 2 visses du support silent bloc et en poussant sur le côté, l'alternateur est sortis.
Modèle : Citroën Berlingo 1.6 hdi 90cv norme euro4 de 2010 235000 kms.
Encore une fois, bravo et merci pour les détails du pas à pas.
J'ai des connaissances en mécanique, mais c'était la 1ere fois que je remplaçais un démarreur.
sebastienwantier - Résolu à la publication Réponse
Que ça été laborieux faut être contorsionniste pour enlever les boulons du démarreur. Merci pour ce tuto sans lui c’était mission impossible j ai faillit abandonner dix fois. Mais la persévérance à payer. Bien degager la ligne d échappement et surtout bien surélever la voiture pour être à l aise pour travailler bref content j ai économiser quelques centaines d euro. Et passé tout de même une journée ..
Bonjour,
Merci pour ce tutoyer et au différents intervenants.
Moi j'ai un 607 2.2 hdi, malgré ce confinement j'ai un boulot que j'ai du arrêter à cause du démarreur d'après les dire des un et des autres. Pouvez vous me dire où et comment y accéder sur ce modèle s'il vous plaît ? de préférence par dessus car la voiture est sur forte pente et ne peut pas démarrer.
Merci
Anli Attoumani - Résolu à la publication Réponse
ah j avais oublier c est sur un expert peugeot 1.6 hdi 16v année 2008
frederic natali - Résolu à la publication Réponse
bonjour j ai un probleme j ai un fil de bon diamètre qui était brancher sur l avant droit vu de l avant sur longeron et l autre est débrancher sur le fil il y a marquer + je ne vois pas ou il va ,si un de vous connais je suis preneur ulysse84
frederic natali - Résolu à la publication Réponse
Bonjour,
Pouvez vous m’expliquer comment vous avez fait? car je prefere intervenir par dessus plutôt que par dessous le véhicule,cela me semble plus simple.
Merci par avance pour vos explications.
Cordialement
Gerard
GERARD EVEILLE - Résolu à la publication Réponse
Sans ce tuto, je serai encore en train de chercher comment déposer ce démarreur
Grand merci à son auteur, mais
- j’ajouterai la nécessité de déposer préalablement le cache sous moteur (3 vis avant, 2 écrous arrière, 2 vis de chaque coté)
- La durée prévue pour l’opération me parait optimiste, je la doublerai (au moins) compte tenu des difficultés inhérentes à cette opération , aggravées par l’inconfort du travail sous un véhicule au sol .
Saint-Bernard
Christian MARANT - Résolu à la publication Réponse
Moi je l’ai changé en 20 minutes en passant par dessus en démontant le filtre à air pour faire la place et sans lever la voiture bien sûr. Très facile (peugeot partner 2.0 Hdi)
alain contamine - Résolu à la publication Réponse
bonjour pourriez vous m’expliquer la procédure a suivre , le mien n’est pas hdi mais le mecano ma dit de faire pareil demonter le tuyau d’air et enlever les 2 boulons mais ne pas toucher au fil . Donc je n’ai pas trop compris je n’y connais rien je vous laisse mon mail stephane6603@outlook.fr merci cordialement