


Difficulté
Facile
Étapes
6
Temps nécessaire
00:20:00

Ce tutoriel a été créé par la communauté
User contributed
-
-
Photo 1: après avoir allumé les phares en position 2, on observe que le feu de croisement coté conducteur ne fonctionne plus.
-
Photo 2: on ouvre le capot, et on aperçoit l'opercule d'étanchéité en caoutchouc àl'arrière de l'optique de phare (flèche orange).
-
Photo 3: afin d'améliorer l'accès à cette zone (cercle jaune), il faudra déposer la batterie.
-
-
-
Avant toute intervention sur la batterie, vérifier que vous possédez le code de déblocage de l'autoradio.
-
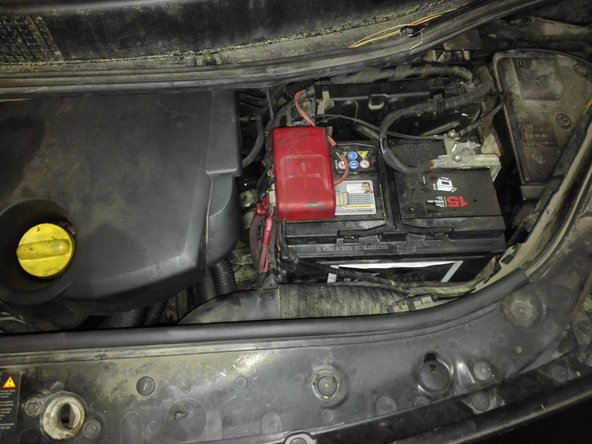
Photo 1: on commence par retirer le cache rouge de la borne +, en tirant dessus doucement (rectangle rouge).
-
Photo 2: on retire les cosses de batterie en dévissant les 2 écrous (flèches oranges) à l'aide d'une clé plate de 10. On peut alors extaire la batterie de son logement.
-
Photo 3: le logement de la batterie, une fois la batterie retirée.
ATTENTION ! On ne commence PAS par retirer le cache rouge qui est au (+) batterie ! Il faut d’abord débrancher le côté (-) (la masse), car si l’on découvre le cache rouge et qu’on introduit une clé pour dévisser les écrous (+) alors que la masse est encore branchée on risque de toucher une partie métallique et faire un court-circuit entre le (+) et la masse. Si le (+) est protégé par un capot isolant, c’est bien pour que justement on ne commence pas par aller y toucher avant que le (-) (masse) ne soit débranché.
Gabriele MANONI - Résolu à la publication Réponse
-
-
-
Photo 1: Une fois la batterie extraite, on peut retirer l'opercule d'étancheité en tirant doucement dessus (flèche rouge).
-
Photo 2: l'opercule en caoutchouc, à conserver.
-
Photo 3: on accède au culot d'alimentation électrique de l'ampoule, qu'on dévisse (flèches jaunes) pour l'extraire de son logement.
-
-
-
Photo 1: on a retiré le culot d'alimentation électrique de son logement, l'ampoule est clipée dessus.
-
Photo 2: on compare les deux ampoules. A gauche l'ancienne dont le filament est cassé, et à droite la neuve, le filament est intact (flèches oranges).
-
-
-
Photo 1: on clippe la nouvelle ampoule dans le culot en respectant la position de l'ergot du culot dans l'encoche de la lampe (cercle rouge). Les deux ailettes (flèches rouges) vont fixer le culot dans l'optique par une rotation d'un quart de tour dans le sens horaire.
-
Photo 2: Une fois le culot fixé dans l'optique, on replace l'opercule d'étanchéité en caoutchouc (cercle orange).
-
-
-
Photo 1: on replace la batterie et on serre les cosses sur les bornes + et - à l'aide de la clé plate de 10.
-
Photo 2: mettre le contact et allumer les phares en position 2 (feux de croisement). Tout fonctionne à nouveau.
-
Le remplacement de l'ampoule est terminé. Il ne reste qu'à débloquer l'autoradio avec le code dont vous disposez. Bonne route!
Si on depose la batterie, faudra reinitialiser de nombreux systemes electriques ?
jeanpaul-guillaume - Résolu à la publication Réponse
il faut connaitre le code de l’autoradio pour le débloquer. il faudra aussi réinitialiser les vitres électriques en effet. Bon courage
Merci beaucoup, j’espère
réussir aussi facilement que vous
IBRAHIMA TRAORÉ - Résolu à la publication Réponse
-


Annulation : je n'ai pas terminé ce tutoriel.
4 autres ont terminé cette réparation.
12 commentaires
Et le coté droit vous faites comment, c’est la galère, merci les ingénieurs de Renault
schtoumpimamour - Résolu à la publication Réponse
Bonsoir,
Démontage de l'ampoule avec la main comme indiqué…. C'est impossible !!!
yveline.thuilliez - Résolu à la publication Réponse
Surtout ne pas tenir compte des commentaires disant qu'on peut passer la main sans demonter la batterie ,ou de.passer par le passage de roue. Ce sont des grosses bêtises qui peuvent prendre beaucoup de temps et provoquer de l'énervement . Une fois la démontée on un a un accès facile ,.sachant que le plus sur est de reclipser la douile dans le phare. Ça m'a pris 15 mn , remise a l'heure et entrée du code autoradio compris.
daniel chenuil - Résolu à la publication Réponse
Merci pour toute cette aide de l'equipe oscaro.
Nordine
dazi nordine - Résolu à la publication Réponse
Bonjour, également en braquant complètement à droite (pour le phare en question), puis démonter le pare boue, et ensuite on peut atteindre le derrière de l’ampoule.
Si on a un peu plus de temps et outillage, on peut démonter la roue pour travailler plus aisément.
Nicolas BEAUX - Résolu à la publication Réponse
Bonjour,
En réponse à Nicolas BEAUX,
C'est la meilleur solution.
L'ampoule vous tend les bras lorsque le pare-boue est dégrafé.
ATTENTION ! On ne commence PAS par retirer le cache rouge qui est au (+) batterie ! Il faut d’abord débrancher le côté (-) (la masse), car si l’on découvre le cache rouge et qu’on introduit une clé pour dévisser les écrous (+) alors que la masse est encore branchée on risque de toucher une partie métallique et faire un court-circuit entre le (+) et la masse. Si le (+) est protégé par un capot isolant, c’est bien pour que justement on ne commence pas par aller y toucher avant que le (-) (masse) ne soit débranché.
Gabriele MANONI - Résolu à la publication Réponse
Bonjour,
Remplacement possible sans dépose de la batterie. La main se glisse sans trop de difficulté dans l’espace qui conduit au logement de la lampe, le poignet se retrouve dans la partie la plus étroite, mais les doigts sont agiles pour toutes manipulations.
Bien à vous.
BZFK
franck berlioz - Résolu à la publication Réponse