


Difficulté
Facile
Étapes
8
Temps nécessaire
00:20:00
- Changer la batterie sur C3 Picasso 8 étapes

Tutoriel complet
Ce tutoriel contribué par la communauté est complet et prêt pour l'examen de l'équipe Oscaro.

Ce tutoriel a été créé par la communauté
User contributed
-
-
Munissez-vous de la documentation du véhicule et des outils nécessaires à l'opération sans oublier les équipements de protection (lunettes, gants, etc).
-
-
-
Avant toute intervention sur la batterie attendre 5 minutes après avoir coupé le contact.
-
Visualiser la batterie
-
Ouvrir le capot de protection positive du cache batterie et la déconnecter.
-
Dé-clipser le calculateur en tirant dessus légèrement.
-
-
-
Dé-clipser les deux ergots afin de retirer le cache du calculateur.
-
Caler le calculateur sur le coté.
-
Dé-clipser la platine en soulevant les deux ergots.
-
-
-
Dé-clipser les câbles du passe câbles et caler la platine sur le coté.
-
Retirer le capot de protection de la batterie enlevant et tirant dessus.
-
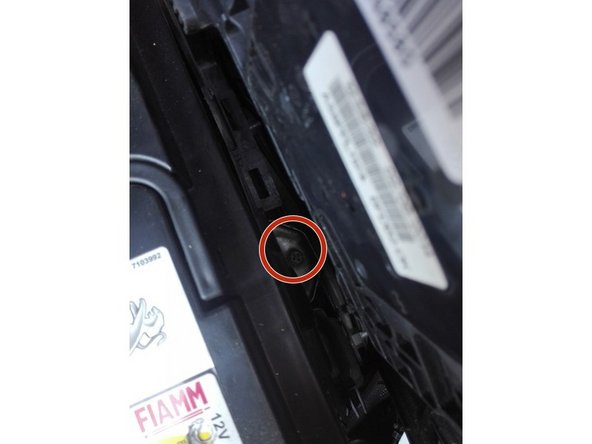
Dévisser la cosse négative à l'aide du cliquet de 8mm
-
-
-
A l'aide du cliquet de 10mm et de la rallonge dévisser le boulon qui maintient la batterie.
-
Retirer la batterie.
-
Nettoyer le fond du support et les cosses à l'aide de papier de verre si celle-ci présente des traces d'oxydation.
-
-
-
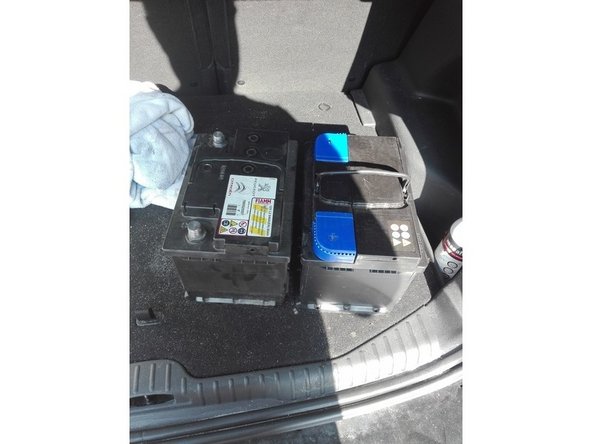
Comparer les dimensions et les caractéristiques techniques des deux batteries.
-
-
-
Replacer la batterie en respectant le sens et la polarité des plots, fixer la batterie à son support et replacer la cosse négative et appliquer une couche de graisse afin de limiter l'oxydation.
-
Replacer le cache batterie, la platine et le calculateur et son cache ainsi que les câbles.
-
Re-fixer la cosse positive et étaler une légère couche de graisse afin de limiter l'oxydation.
-
-
-
attendre 5 minutes après avoir rebrancher la cosse positive avant de remettre le contact.
-
Régler les différents paramètres qui auraient pu ce dérégler (heure, date...).
-


Annulation : je n'ai pas terminé ce tutoriel.
7 autres ont terminé cette réparation.
9 commentaires
Excellent tuto, les explications sont très claires et les photos complètent bien l'information. Pourtant quand j'ai ouvert le capot, j'ai cru que je ne pourrais jamais changer la batterie. Mais finalement grâce au tuto, ce n'est pas si compliqué. Le remontage est plus facile, et après 5 minutes, ça redémarre au quart de tour.
Merci !
JJ Loiseau - Résolu à la publication Réponse
Bonjour et merci pour ce tuto très pratique, avec toutefois quelques erreurs à corriger:
Étape 2:
Pour déclipser le calculateur, il faut tirer verticalement et non horizontalement vers soi comme la flèche bleue l’indique sur la photo.
Étape 3:
Il n’est pas nécessaire de retirer le cache du calculateur, il suffit de déclipser l’ensemble et de le caler sur le côté.
Étape 4:
Le capot de protection de la batterie est maintenu à l’arrière (sous le bocal de liquide frein) par deux encoches en plastique.
Ne surtout pas tirer dessus vers soi comme l’indiquent les flèches rouges sur la photo, cela va casser les encoches de maintien !
Il faut donc le faire pivoter (comme une charnière) en commençant par l’avant puis défaire le capot de ses encoches arrières.
Étape 5:
Il faut dévisser le boulon mais aussi le retirer et enlever la pièces de maintien de la batterie.
PATRICK FLEURIET - Résolu à la publication Réponse
Bonjour, j’ai un problème de direction assistée après le remplacement de la batterie. Est-ce un problème en lien avec le calculateur ?
Merci d’avance.
Hermann Bechtel - Résolu à la publication Réponse
merci pour ce tuto,j ai juste mis une batterie en parralelle pour pas risquer de deconnecter qqch; très bon tuto
gerard bourdin - Résolu à la publication Réponse
Bonjour
Il faut pas oublier le facteur du système de freinage electrique. J'en ai eu l'expérience impossible de bouger la voiture car elle était en plein milieu d'un parking quand j'ai voulu la ponter avec une autre voiture. Quelle rage j'avais merci le progrès mais pas celui ci. Je trouve que c'est dangereux heureusement j'étais sur un parrangement privé. La batterie ou pile de secours me semble une bonne alternative . Très bonne déduction .
Manuel Martos - Résolu à la publication Réponse