


Difficulté
Très facile
Étapes
6
Temps nécessaire
00:05:00 - 00:20:00

Ce tutoriel a été créé par la communauté
User contributed
-
-
Lorsque vous avez les feux de croisements allumés et que vous vous apercevez qu'un de vos phare n'éclaire pas, c'est certainement l'ampoule qui est grillée !
-
Pour accéder à l'ampoule, on ouvre le capot.
-
-
-
Le puissant moteur 1.6 TDI s'offre à nous : les ampoules des feux de croisement sont sur les côtés à l'avant.
-
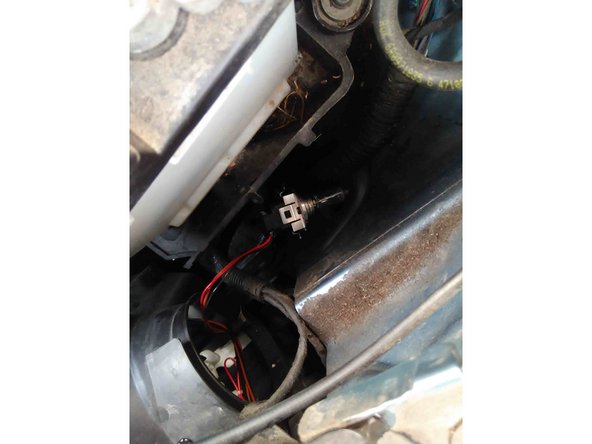
L'emplacement de l'ampoule se cache dans un petit compartiment recouvert d'un gros bouchon en caoutchouc.
-
-
-
Retirer le bouchon en caoutchouc (il faut simplement tirer dessus, aucune difficulté).
-
On a accès à l'intérieur du compartiment! Pour enlever l'ampoule, il suffit de faire un quart de tour dans le sens contraire des aiguille d'une montre.
-
Franchement, ça vient assez facilement, attention quand même de ne pas tout arracher !
-
L'ampoule peut être dégager de son compartiment, mais reste fixée à son support. La connectique y reste attachée, donc attention de ne pas arracher la connectique ! Il faut enlever l'ampoule du support : là encore, un peu de doigté !
-
-
-
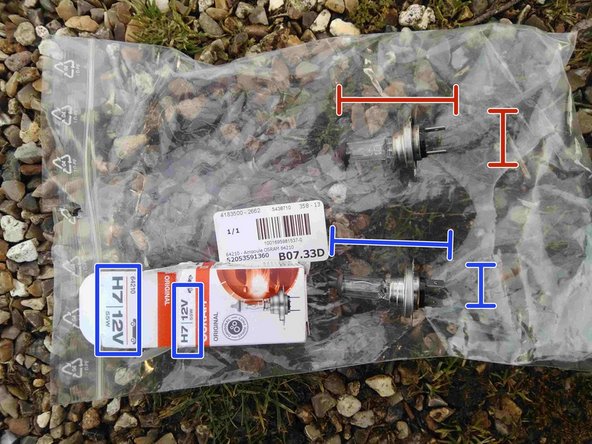
Passage obligé dans tout bon tutoriel Oscaro : la comparaison des pièces !
-
Ici, c'est assez facile, sachant que l'ampoule répond à une classification bien précise : pour un feu de croisement, il vous faut une amoule H7.
-
Sur la deuxième photo, on voit bien que l'ampoule est bien grillée, il n'y a plus de connexion entre les 2 bouts !
-
Attention quand vous manipulez l'ampoule neuve, le gras des doigts sur le verre de l'ampoule halogène, ça ne fait pas bon ménage ! Donc on manipule autant que possible l'ampoule avec ses cosses métalliques.
-
-
-
Commencer par remettre l'ampoule sur son support.
-
Puis il faut fixer le support dans le compartiment, en faisant cette fois un quart de tour dans le sens des aiguille d'une montre.
-
Puis on remet le bouchon en caoutchouc.
-
-
-
On remet le contact, on allume les feux de croisement, et on va voir le résultat de son dur labeur : ça marche !!! (normalement !)
-
Maintenant que vous venez de vous dépanner tout seul comme un grand, aller de suite commander une ampoule H7 sur votre site de pièces détachées préféré, pour que vous puissiez agir rapidement la prochaine fois que l'autre ampoule grillera !
-
Il faut toujours avoir une ampoule d'avance !
-


Une opération très facile à réaliser soit même : il faut juste y aller doucement sur le déclipsage du support de l'ampoule, puis le déclipsage de l'ampoule du support.
Attention à ne pas toucher le verre de l'ampoule avec les doigts !
Une opération très facile à réaliser soit même : il faut juste y aller doucement sur le déclipsage du support de l'ampoule, puis le déclipsage de l'ampoule du support.
Attention à ne pas toucher le verre de l'ampoule avec les doigts !
Annulation : je n'ai pas terminé ce tutoriel.
3 autres ont terminé cette réparation.
3 commentaires
Idem, j'ai fini par déposer la batterie pour accéder aux ampoules de gauche dont le support n’est visiblement pas fait pour être démonté et qui de plus, n’est pas dans l’axe de l’obturateur. Mes remarques concernent la Fabia 3
eric.beretti - Résolu à la publication Réponse
J'ai réussi grâce à ce tuto mais c'était laborieux !
floriankondor - Résolu à la publication Réponse
Très facile, faut pas exagérer. J’ai eu un mal fou à dévisser la première ampoule et pire à la revisser. Pour l’autre dont on ne parle pas ici c'est pire. L’emplacement est très étroit pour glisser la main et il m’a été impossible de dévisser cette putain d’ampoule ! Elle est bloquée et je me suis blesser la main. Je vais quand même être obligé d'aller chez un garagiste. Grrr. Je suis super énervé maintenant !
Francois JANIN - Résolu à la publication Réponse