


Difficulté
Très facile
Étapes
7
Temps nécessaire
00:10:00 - 00:25:00

Tutoriel complet
Ce tutoriel contribué par la communauté est complet et prêt pour l'examen de l'équipe Oscaro.

Ce tutoriel a été créé par la communauté
User contributed
Introduction
'''Les étapes sont identiques pour un moteur 1.6 TDI (>2010) que pour un moteur 1.4 TDI (<2010, 3 cylindres)
Attention néanmoins, les moteurs CAYB (1.6 tdi 90ch) et CAYC (1.6 tdi 105) demandent un outil de diagnostique pour l'étape 7 '''
-
-
Ouvrir le capot avec la manivelle placée en bas à gauche sous le volant
-
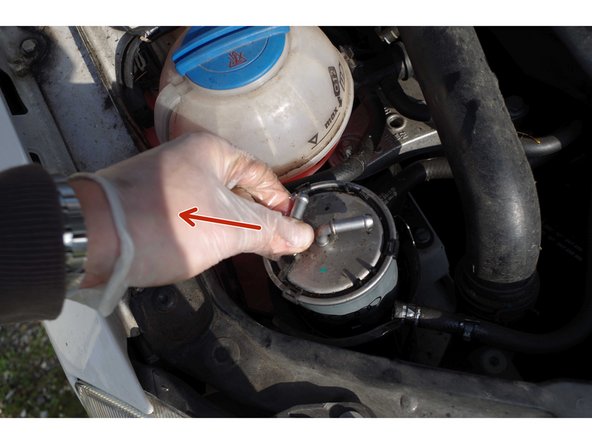
Localiser le filtre à gasoil
-
-
-
Pour retirer le filtre, il faut commencer par débrancher les 2 durites de gasoil (entrée et sortie).
-
Elle sont fixées par des petites pinces métalliques, qu'il vous faudra décaler à l'aide d'une pince multiprise.
-
-
-
Les durites n'étant désormais plus pincées, elles sont libres... enfin plus ou moins... Des années qu'elles n'avaient pas été touchées, du coup, elles sont un peu collées aux branchements du filtre.
-
Il faut donc tirer les durites dans l'axe, doucement mais sûrement !
-
Attention à ne pas les abimer, mais vous allez voir que vous devrez forcer un peu... Vous pouvez éventuellement vous aider d'un outil (tournevis plat fin?) pour parvenir à vos fins.
-
Attention au gasoil qui va couler lorsque vous aller dégager les durites. Des gants fins en plastique vous protègeront les mains tout en vous laissant de la dextérité !
-
-
-
Les durites étant dégagées, il reste une fixation du filtre dans son logement.
-
Elle se compose de 3 ergots qui reviennent sur le dessus du filtre. Il suffit des les repousser vers l'extérieur pour qu'on entende un "clic".
-
Le filtre est alors libre d'être retiré par le haut.
-
-
-
Moment tant attendu : la comparaison des filtres ! Les voilà tous les deux l'un à côté de l'autre pour pouvoir comparer hauteur, diamètres, entrées/sorties ...
-
La vue de dessus permet d'identifier que les filtres possèdent bien tous les 2 les 3 logements pour les 3 ergots qui viendront le maintenir en place dans son logement.
-
Attention, certains filtres ne dispose pas de ces logements en plastique noir, je vous conseille, lors de votre achat, de bien vérifier sur la photo du nouveau filtre que vous choisirez, que ce plastique noir figure bien sur le dessus du filtre.
-
-
-
On procède en sens inverse, tout d'abord les 3 ergots dans leur logement, avec le "clic" caractéristique qui nous assure que le nouveau filtre à carburant est bien en place.
-
Puis on remet en place les durites. D'abord engager celles-ci sur les entrée/sortie du filtre, puis en ramener les pinces pour étancher les raccords.
-
-
-
Le nouveau filtre est en place, les durites sont bien engagées et fixées par les pinces métalliques qui sont revenues à leur place.
-
Il faut maintenant remplir le filtre à gasoil.
-
Pour cela, on met le contact (sans démarrer !!), puis on remet la clé sur off. Et cela une bonne vingtaine de fois! Cette manipulation permet d'actionner la pompe à gasoil, qui va envoyer le gasoil dans le filtre.
-
Attention, cette opération est valable pour les moteurs 1.4 tdi 80ch (BNV) et 1.6 tdi 75ch (CAYA). Pour les moteurs 1.6 tdi 90 et 105 ch (CAYB et CAYC), la pompe à carburant doit être commandée par un outil de diagnostique !
-
Le mieux est de prévoir une pompe à gasoil même si vous avez un moteur 75ch (CAYA), au cas où la manip ne marcherait pas.
-
Le mieux pour cette manipulation est d'être 2 : un qui met le contact puis éteint, l'autre qui écoute si le fluide est bien en train de circuler dans les durites. Cela s'entend facilement, pas besoin d'être expert !
-
Une fois que l'action de mettre le contact et d'éteindre ne fait plus rien circuler (on entend plus grand chose, éventuellement une petite mise en pression), cela signifie que le filtre est plein, on peut démarrer !
-
Attention, pour entendre le fluide circuler, il faut être à côté du filtre, devant le volant, on entend rien !
-


Annulation : je n'ai pas terminé ce tutoriel.
5 autres ont terminé cette réparation.
5 commentaires
Bonjour, je viens d’acheter une skoda fabia II phase 2 scout 1.2 TDI FAP 12V 75CV pour mon fils.
Pourrai-je savoir si la procédure pour amorcer le circuit de gasoil convient aussi ?
Merci pour votre réponse.
Giuseppe CERENZIA - Résolu à la publication Réponse
Bonjour !
Je ne possède pas toutes les motorisations de Skoda Fabia II qui existent !! (2 c’est déjà pas mal !)
Alors pour la même question, je ferais la même réponse :
- prévoyez une petite pompe à main avant de toucher à quoi que ce soit
- faîte comme indiqué dans le tuto
- si cela s’avère infructueux, utilisez votre pompe à main pour remplir le nouveau filtre avec la pompe.
Il vaut mieux prévoir la pompe à main avant de commencer les opérations, parce qu’une fois que le vieux filtre est enlevé et si vous l’avez vidé, vous ne pourrez pas redémarrer pour aller chercher du matériel !
bon courage !
Bonjour, je ne saurais pas répondre précisément à la question, mais j’ai fais exactement la même manip sur le filtre à gasoil d’une Fabia 1.4 TDI 80ch (code moteur BNV). Et les moteurs BNV et BNM ont l’air très similaire (il me semble que seule la puissance change).
Au pire, essayez de trouver une sorte de petite pompe à main (avec poire d’aspiration, on en trouve facilement) pour remplir le filtre manuellement, si jamais la première procédure s’avère infructueuse… C’est ce qu’on fait sur les moteur HDi, sauf que la poire d’aspiration est déjà présente sous le capot !
Du coup, ce que je ferais à votre place : essayer comme dans le tuto. Si ça marche pas, enlever le filtre et le remplir avec la pompe, puis le remettre en place et essayer à nouveau…
yann.prehu - Résolu à la publication Réponse
Bonjour,
Je viens de changer le filtre avec succès, en effet, en tournant la clé 10 fois cela a suffit à remplir le filtre. Merci encore pour vos conseils et pour le tuto.
Bonjour merci pour ce tuto très bien réalisé. Je possède un moteur 1.4 TDI de 70 ch de 2007 (code BNM). Pour amorcer le circuit de gasoil, la procédure qui consiste à mettre le contact sans démarrer est-elle également valable ?
Daniel ROGER - Résolu à la publication Réponse