


Difficulté
Facile
Étapes
5
Temps nécessaire
00:25:00 - 00:40:00
- Remplacement du calorstat 5 étapes

En cours
Ce tutoriel est en cours de création. Revenez de temps en temps pour voir les modifications.

Ce tutoriel a été créé par la communauté
User contributed
Outils
Pièces
-
-
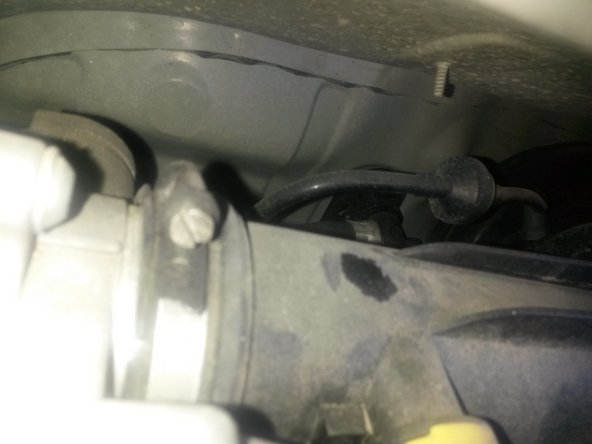
Sur le moteur 1.4i 75 cv, pas besoin d'un démontage pour accéder au calorstat. Il est sur le devant, du moteur, accessible à droite du bloc moteur.
-
-
-
Placer sous le calorstat, une bassine pour récupérer le liquide de refroidissement qui va s'écouler. Une fois la durite démontée en tirant dessus, le liquide va s'écouler. Ouvrir le bouchon du réservoir de liquide pour que cela s'écoule mieux.
-
Avec une clef à pipe de 10, ou mieux, un cliquet articulé muni d'une douille de 10, démonter les deux goujons qui fixent le calorstat sur le bloc moteur.
-
Attention, le calorstat de ce modèle est reliée au calculateur moteur par un cable électrique. Démonter avec précaution le calorstat et débrancher la prise jaune.
-
-
-
Une fois le calorstat démonté, le comparer avec la nouvelle pièce. Ici le calorstat était bloqué en position ouverte et le moteur ne chauffait pas assez. En soufflant dans l'emplacement de la durite, l'air passait tout le temps.
-
Placer le nouveau calorstat, visser délicatement les 2 goujons à la main pour s'assurer que les filetages mordent correctement. Bloquer ensuite avec la clef à douille.
-
Rebrancher la prise de la résistance interne.
-
Pour finir, replacer la durite en prenant bien garde à la position du lien métallique. Le débloquer avec la pince.
-
Remplir le circuit de refroidissement avec du liquide neuf.
-
-
-
Le plus pénible reste à faire. Il faut ouvrir le purgeur du radiateur de chauffage de l'habitacle. Le purgeur (ressemblant à un bouchon de valve auto) est caché derrière la conduite d'alimentation en air du moteur.
-
Avec des doigts de fée mais une poigne d'ogre, desserrer délicatement l'embout.
-
Attention à ne pas le perdre en le faisant tomber au sol.
-
Laisser l'air sortir du circuit de chauffage. Une fois le débit stabilisé serrer délicatement avec le bout des doigts l'embout.
-
Mettre à niveau le liquide de refroidissement dans le vase d'expansion.
-
Faire tourner le moteur pour assurer la purge complète du circuit. Bien être certain que le calorstat se soit ouvert (la durite du radiateur de refroidissement va chauffer, le ventilateur va se mettre en marche puis s'arrêter).
-


Annulation : je n'ai pas terminé ce tutoriel.
Une autre personne a terminé cette réparation.