


Difficulté
Difficile
Étapes
5
Temps nécessaire
02:00:00

Ce tutoriel a été créé par la communauté
User contributed
Introduction
Motorisation du véhicule 1.4 HDi 70 cv
-
-
Afin d’accéder aux fixations de l'amortisseur il est nécessaire de déposer le garde boue. Il y a 4 agrafes en plastique et un écrou.
-
Mise en sécurité du véhicule : démontage et remontage de la roue
-
A l'aide d'un tournevis plat, soulever le centre rectangulaire de l'agrafe pour la déverrouiller et la déposer.
-
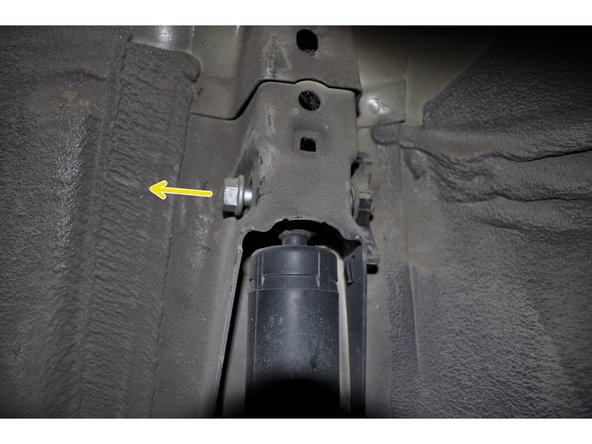
Utiliser une clé à pipe de 10 pour déposer l'écrou de fixation.
-
-
-
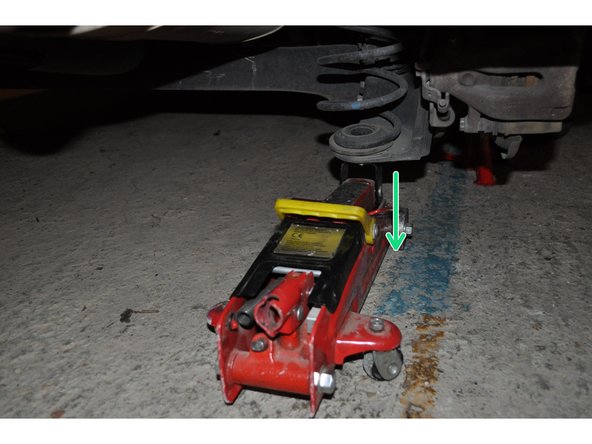
Placer un cric sous le ressort pour compresser la suspension et ainsi soulager la vis de fixation.
-
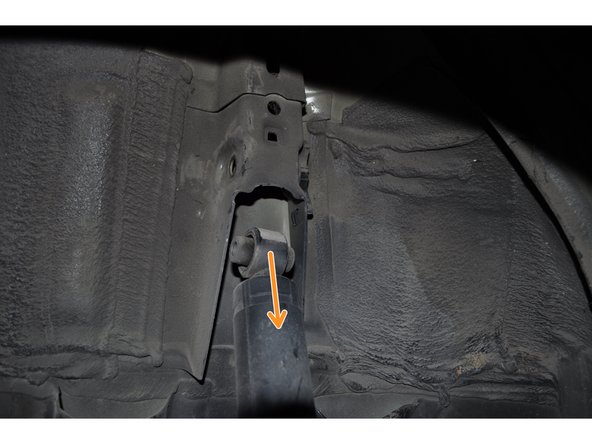
Utiliser une clé de 21 pour déposer l'écrou, puis déposer l'axe de la fixation inférieure.
-
-
-
La fixation supérieure de l’amortisseur est composée d'une vis et d'un écrou prisonnier.
-
Utiliser une clé de 16 mm pour dévisser l'axe. Il faut maintenir le corps de l’amortisseur avant de retirer l'axe.
-
Déposer l'amortisseur en le tirant vers le bas.
-
-
-
Comparer les dimensions de la suspension.
-
Insérer l'amortisseur dans le support du châssis et le fixer avec la vis. Serrer avec une clé dynamométrique à 4.5 Nm.
-
Aligner le bas de l'amortisseur avec le berceau arrière puis placer l'axe pour le positionner. Serrer l'écrou à l'aide d'une clé dynamométrique à 9.3 Nm.
-
-
-
Redescendre le cric.
-
Remonter le garde boue et la roue.
-
Faire la même procédure pour l'autre amortisseur.
-


Annulation : je n'ai pas terminé ce tutoriel.
5 autres ont terminé cette réparation.

7 commentaires
Pour le mien impossible de desserré le boulon avec la clé de 21, boulonneuse rien a faire .
Sur une C2 vts de 200 000km
Quand j'ai sortie l'amortisseur le silent bloc est resté dedans . Obligé de joué de la meuleuse pendant 1h30 .( Ben oui forcément quand le silentbloc est resté dessus on ne peut pas le remonté comme ça ).
Je pense que le droit sera pareil même dans 2 semaines avec du wd40 dedans .
On verra bien .
Mais c'était pas une partie de plaisir . Si il sort pas le mieux est je pense sortir étrier et disque pour jouer de la meuleuse et avoir un disque a lamelle aussi.
Super tuto , très bien expliqué, le top les photos. Un vrai plus !
Bon , pas si évident avec la rouille et les années , mais avec la patience , on y arrive . J’ai connu beaucoup plus dur …..!
un truc ! Ne jamais taper direct avec un marteau sur un axe fileté, mais tjrs lui laisser l’ecrou ( deserré ) en place !
Olivier CARON - Résolu à la publication Réponse
Bonsoir c est surtout que le boulon se soude sous l effet de la rouille..sans visseuse a choc le boulot ne tourne pas et cela permet de le dérouiller..;sinon petit logement sous le bras de suspension pour pulvériser dégrippant…sinon un vrai bordel pour remettre le boulon de pare choc…le mieux la remettre a l envers….
jean-francois Schleret - Résolu à la publication Réponse
Dans mon cas aussi, sur une C2, il a été impossible d’extraire l’axe du bas. Toutefois, ça n’empêche pas d’extraire l’amortisseur, il suffit d’être délicat avec la conduite souple de frein.
Super tuto !
Guilhem DEJEAN - Résolu à la publication Réponse
Merci pour le tuto
Opération E/S amortisseur comme un pro
LIONEL DURAND - Résolu à la publication Réponse