Introduction
Remplacement de Moyeux/roulement de roues Arrière sur Ford Mondeo III de 2001 à 2007 - 2.0 i 16V 145cv
-
-
Soulever le Côté du Véhicule qui vous intéresse avec un Cric, de préférence à roues, puis assurer la sécurité avec une Chandelle. Ensuite déposer la roue.
-
Insérer un tournevis plat entre la plaquette et le piston de l'étrier pour faire levier et ainsi écarter le piston pour laisser du jeux au retrait de l'étrier.
-
Desserer les 2 vis des coulisseaux fléchés en bleu avec une clé 6 ou 12 pans de 12mm.
-
S'assurer que les coulisseaux ne soient pas grippés. Sinon les extraire, nettoyer les cylindre et remettre de la graisse.
-
-
-
Desserrer les 2 vis du support d'étrier avec une clé 6 ou 12 pans de 13mm. Attention de bien tenir le support d'étrier quand il sera entièrement dévissé car il va tomber tout seul.
-
Retirer les bague-clips qui tiennent le disque avec les goujons du moyeux.
-
Disque parfois grippé par la corrosion sur l'axe du Moyeu. N'hésitez pas à pulvériser du dégrippant à la base des goujons et sur l'axe du Moyeu.
-
Retrait du disque en tirant dessus. Si il ne vient pas prendre un maillet caoutchouc, ou marteau avec une cale en bois et taper doucement pour éviter de voiler le disque en le faisant tourner uniformément pour répartir les chocs.
-
Mesurez le voile du disque, pour s'assurer qu'il soit bien dans les normes constructeurs, sinon faite le Remplacement obligatoire!!!
-
-
-
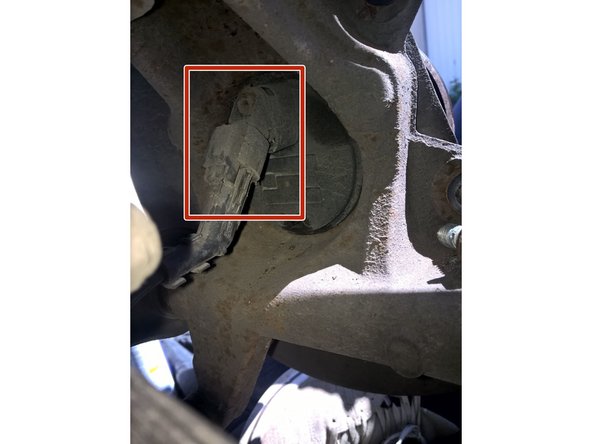
Débrancher le capteur et écartez bien la prise du capteur.
-
Desserrer les 4 vis de la bride du moyeu. Utilisez une clé torx mâle T45.
-
Mettez du dégrippant sur les 4 vis de la bride du moyeu car elles ne facile à avoir!
-
Si le dégrippant ne suffit pas, prenez un Gé en Bronze et un marteau et tapez fort en quinconce de la vis et de la Bride du moyeu.
-
Dans mon cas, J'ai dû utiliser un Flambard Gaz et chauffer la bride au niveau des vis, d'où, l'importance de bien écarter la prise du capteur ABS.
-
Nettoyer la surface plane pour enlever la rouille. Utiliser du papier de verre. Mettez une très fine couche de graisse pour éviter la rouille.
-
Nettoyer la parti chanfreinée de la bride du porte moyeu. Utiliser une brosse métallique et/ou du papier de verre. Mettez une très fine couche de graisse pour éviter la rouille.
-
Nettoyer la flasque en tôle avec du papier de verre pour enlever la corrosion.
-
-
-
Voici le moyeu tout neuf, s'assurer que le capteur fonctionne et que les roulements tournent.
-
Voici l'ancien moyeu, qui était HS car les roulements qui se trouvent dedans avaient du jeu.
-
Le remontage se fait à l'inverse du démontage, donc suivre les étapes en revenant en arrière...
-
Attention au disque quand vous le remettez en place, si vous aviez les mains grasse bien le dégraisser!
-
Annulation : je n'ai pas terminé ce tutoriel.
5 autres ont terminé cette réparation.
11 commentaires
Merci pour ce tuto bien fait et utile. Manquait seulement les valeurs de couple de serrage pour ceux qui utilisent une clé dynamo et ceux de la roue aussi (jantes alu) pendant qu’on y est ! ;-)
merci à vous pour les commentaires, et le couple de serrage est dans les commentaires. cordialement.
Bonjour, je suis l’auteur du tutos, mais suis avec le compte de ma femme, et le serrage des 4 vis du moyeu arrière est de 70Nm désolé pour le retard, mais pour les autres personnes qui le feront encore, ça servira. bon courage à tous les mécanos pro ou amateur.
Bonjour
Cédric Valtz avez vous trouvez une réponse à votre question sur le couple de serrage des vis du moyeu arrière???
Cordialement.
A quel couple faut-il serrer les vis du moyeu au remontage ?


