


Difficulté
Modérée
Étapes
9
Temps nécessaire
00:50:00 - 02:00:00

Tutoriel complet
Ce tutoriel contribué par la communauté est complet et prêt pour l'examen de l'équipe Oscaro.

Ce tutoriel a été créé par la communauté
User contributed
Introduction
"Tutoriel réalisé sur Skoda Fabia 1.6 TDI 75ch (moteur CAYA)"
-
-
Ouvrir le capot
-
Retirer le cache moteur
-
Attention, les points de fixation sont assez fragiles, et vous risquez de fissurer le plastique ...
-
-
-
Vous allez devoir vaporiser un dégrippant dans le logement des bougies. Pour que l'opération soit efficace, il faut qu'un certain nombre de cycles chaud/froid aient été réalisés suite aux vaporisations. Cette alternance chaud/froid permet aux bougies (ainsi qu'à leur logement) de travailler en dilatation.
-
Ces micro-mouvements des métaux vont permettre au dégrippant de pénétrer le long de la bougie, à l'intérieur de son logement, et notamment de son filetage.
-
C'est le passage clé de cette opération. Les bougies se sont certainement un peu bloquées dans le logement à cause de la calamine (elles sont en lien direct avec la chambre de combustion !). Le dégrippant va permettre un desserrage sans forcer, sans casser.
-
Selon votre utilisation de la voiture (longs ou courts trajets, fréquents ou pas), la durée de cette phase de dégrippage va être plus moins longue. Il faut que le moteur ait fait au moins 10 cycles chaud/froid avant de passer à l'étape de desserrage des bougies.
-
Et notez par ailleurs qu'aller chercher du pain à la boulangerie en 5 minutes ne constitue pas un cycle chaud/froid ! (vous pouvez vous aider du voyant de température d'huile pour avoir une idée de si le moteur est suffisamment monté en température, même si je trouve qu'il disparait un peu trop vite).
-
Vous pouvez donc vaporiser le dégrippant en vous contentant d'enlever le cache moteur, et de vaporiser le plus profond possible dans le logement des bougies (avec une tige longue et creuse). Vous pouvez également passer un coup de soufflette AVANT le dégrippant, pour enlever toutes les saletés (le dégrippant risque de les amener sur les bougies !).
-
-
-
Le produit a pénétré, et vous avez maintenant toutes les chances pour que la calamine accumulée se soit partiellement dissoute, et ne vous pose aucun problème.
-
Attention, l'opération de remplacemnt des bougies doit se faire moteur chaud (à la différence de bougie d'allumage pour les moteur essence).
-
Avant toute opération, par mesure de sécurité, on débranche la batterie (et on enlève sa montre avec bracelet en métal pour éviter les courts-circuit accidentels !).
-
On peut maintenant retirer les connectiques qui alimentent chaque bougie.
-
Mon conseil : utiliser une pince à bec courbe (pas trop courte). Il faut que la courbure puisse arriver au fond du logement, pour pincer la connectique en plastique, et vous permettre de déclipser l'alimentation.
-
-
-
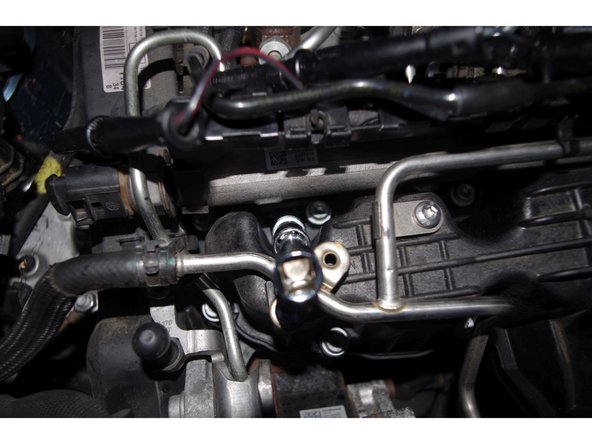
Au fur et à mesure que vous enlevez chaque connectique sur les 4 bougies, vous allez devoir également vous occuper de retirer la rampe qui distribue chaque connectique (ici encadrée en rouge). Une petite pince sur la rampe d'injection est en extrémité (côté bougie gauche), ici entourée en rouge.
-
C'est un peu difficile car vous n'avez pas beaucoup de fil, et le problème est aussi que chaque connectique plastique est assez longue, et bien engagée dans le logement.
-
Sur la 2ème image, on peut voir les logements vides, et les connectiques plastiques toutes dégagées, écartées vers le haut.
-
Sur la 3ème bougie, on voit la première connectique dégagée, avec le logement vide, la tête de bougie étant au fond. On voit aussi que j'ai vaporiser du dégrippant (sa brille au fond du puits !), et c'est plein de saleté ! D'où le fait de nettoyer autant que possible AVANT de vaporiser du dégrippant !
-
-
-
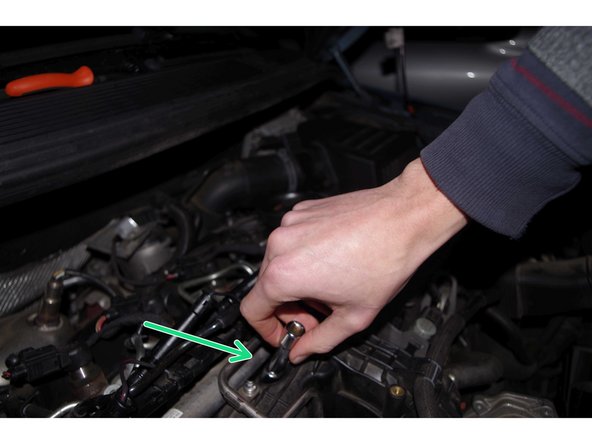
Puis, on se muni du coûteux (mais nécessaire) matériel : une clé dynamométrique, ainsi que de la clé à bougie (couteuse aussi) (mais non moins nécessaire!). Il nous faudra ici 2 petites rallonges pour arriver au fond du logement des bougies ! Le diamètre des bougies est de 10mm.
-
La première photo montre un logement vide, et propre ! C'est important, car lorsque vous desserrerez les bougies, si la tête est sale, des impuretés risquent de tomber dans le puits de la bougie, et de se loger, soit dans le filetage, soit dans la chambre de combustion ! (ce qui n'est pas recommandable, vous l'aurez deviné)
-
Insérez donc votre clé à bougie sur la tête de la bougie (tout en la maintenant par les rallonges). Ainsi, il vous reste plus qu'à mettre votre clé dynamométrique en mode desserrage, et à desserrer prudemment.
-
ATTENTION : NE PAS FORCER !!! Si vous forcez trop, les bougies risque de casser dans la culasse !
-
Le mieux étant d'envoyer un petit mail au constructeurs des bougies (que vous avez acheté), pour demander le couple de cisaillement, c'est à dire le couple maxi à partir duquel les bougies risquent de casser.
-
Un constructeur (japonais) m'a répondu (suivez mon regard ^^), et m'a dit que c'était à peu près 40 N.m. Cela permet de s'arrêter avant, grâce à votre couteuse clé dynamométrique ! (et ainsi d'être sûr de ne pas casser vos bougies !)
-
Un autre constructeur (allemand) n'a pas pu me donner ce couple, mais de toutes façons, l'idée est d'avoir un ordre de grandeur, car les bougies que vous avez acheté sont d'une certaine marque, et celle qui sont déjà à l'intérieure, probablement d'une autre... Ca donne juste une idée.
-
-
-
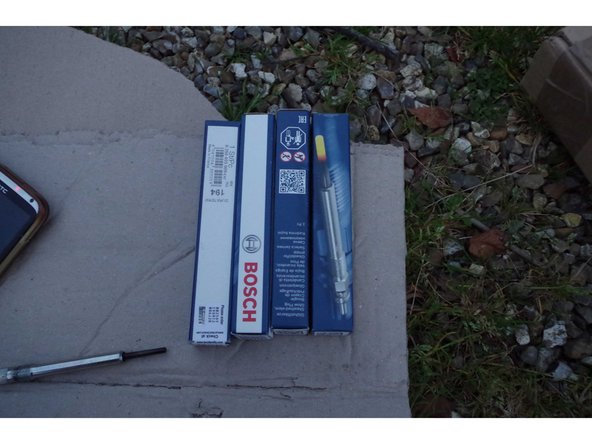
LE moment tant attendu par tous : la comparaison des bougies, avant et après 112 000km ! (et 7 ans).
-
Bien vérifier : la longueur, mais surtout les têtes de bougies, les longueurs de filetage (au passage, sur la 3ème photo, on voit la calamine dissoute sur la vielle bougie).
-
-
-
Inutile de dire que pour environ 11€ la bougie, vous les changez toutes ! Pas la peine d'engendrer une assymétrie entre les cylindres.
-
Vous pouvez aussi mesurer la résistance des bougies, pour vous assurer qu'elles n'ont pas de défaut (et comparer la résistance avec les anciennes bougies).
-
Autre conseil : laissez votre moteur à l'air libre le moins longtemps possible ! Je m'explique : lorsque vous enlevez une bougie, la chambre de combustion est à l'air libre. Il va donc de soit qu'on ne fait pas cette opération en extérieur, où bien par temps sec !
-
Je vous conseille donc d'enlever une ancienne bougie, puis de mettre la nouvelle, avant de passer à la 2ème.
-
Avant de mettre les bougies dans leur logement, il faut lubrifier le filetage avec de la graisse spéciale haute température : j'ai nommé la graisse au cuivre !
-
Enduisez soigneusement le filetage, pas trop non plus, pour que le serrage se fasse sans encombre. Un futur desserrage (vers 200 000 km?) en sera également facilité. Il permet aussi l'étanchéité.
-
-
-
La mise en place des nouvelles bougie se fait à la main, ainsi que le serrage. Evidemment, vous allez peiner au bout d'un moment (!), et ce sera le temps de vous re-munir de votre coûteuse (mais nécessaire) clé dynamo.
-
Cette précaution vous prémuni de foirer le filetage. Si vous attaquez directement à la clé, vous ne sentirez pas si la bougie est bien engagée dans le filetage, et une mauvaise manipulation à ce stade peu se révéler très problématique.
-
Donc, d'abord à la main, PUIS, à la clé, en mode serrage. Le serrage est particulier pour chaque type de bougie. Ici encore, un petit mail préventif au constructeur vous renseignera sur le couple à exercer. Ici, pour les bougies que j'ai utilisé, le couple était de 18 N.m.
-
-
-
Une fois les 4 bougies remplacées et serrées au couple, il ne vous reste plus qu'à rebrancher les connectiques des bougies.
-
Il faut bien faire attention à entendre le "clip" qui confirme que la connectique en plastique est bien branchée sur la tête de la bougie.
-
Je vous conseille de procéder au rebranchage des connectiques de droite à gauche, en raison de la longueur des fils électriques.
-
N'oubliez pas de remettre la rampe (qui distribue les connectiques) en place, de rebrancher la batterie, et ... démarrez !
-
Si tout ce passe bien, remettez le cache moteur, et refermez le capot, vous êtes repartis pour 100 000 km !
-


L'opération doit être méticuleusement préparée :
1. Vaporisation de dégrippant pendant une semaine avant l'opération (selon utilisation de la voiture et nombre de trajets)
2. Nettoyage du logement des bougies avant le remplacement (afin que rien ne s'introduise dans le moteur).
3. il faut impérativement s'équiper d'une clé dynamométrique pour pouvoir desserrer sereinement (sans risquer de casser les bougies dans le culasse) et serrez au bon couple que le constructeur préconise.
4. Dans tous les cas, un petit mail au constructeur pour valider les infos que vous avez vous rassurera ! Il vous donnera précisément le couple de serrage et peut-être le couple de cisaillement.
Pour vous aider, plusieurs vidéos (de constructeurs) existent sur internet. Elles résument bien les opérations et insistent sur les points important.
Annulation : je n'ai pas terminé ce tutoriel.
3 autres ont terminé cette réparation.
7 commentaires
Bonjour et MERCI BEAUCOUP!
Sur FABIA II Phase 2 1.6 TDI FAP 16V 90cv Monte Carlo de 2012 code moteur CAYB,
avec clé FACOM J306-50D réglé sur 15 Nm, le désserrage est venu pile à la valeur, le WD40 reste bien dans une gorge au fond, 6 cycles à température d’huile moteur 75-80 °C avec renouvellement WD40, SUPERBE technique du collier plastique rylsan monté à l’envers et placé au fond derrière la collerette du capuchon noir, ça se déclipse sans problème, souflette impérative à chaque étape, montage d’origine BERU GERMANY avec le code VW, LUBRIFIANT cuivré SOGELUB MD1000C pour le remontage….
Christophe - 47 ans
Merci bien monsieur très très bien et des conseils precieux
Je me pose la question pourquoi pas en video
oulad_saad - Résolu à la publication Réponse
Bonjour,j ai eseiller 2 pinces a bec que je possede et j ai pas reusi a declipser la connectique de la bougie,quelle pince vous me conseiller exactement ? Merci
Bonjour Alain, vous pouvez voir la pince que j’ai utilisé à l’étape 3, la troisième photo. Sinon, dans le premier commentaire du tuto Bernard donne une astuce qui peut être intéressante… Je n’ai pas de référence à vous donner quant à la pince à utiliser, il faut juste qu’elle soit assez longue et avec un bec courbe… Si vous n’en avez pas, achetez en une (moins de 10€ je pense), moi je m’en sers souvent pour l’électricité (quand il s’agit de prendre les fils un par un dans une prise ou l’accès est difficile).