


Difficulté
Facile
Étapes
6
Temps nécessaire
00:30:00

Ce tutoriel a été créé par la communauté
User contributed
Introduction
Ce tuto vous montre les étapes pour changer la sonde de température d'eau de votre Peugeot. Le modèle présenté dans le tuto est une 306 1.8 16v phase 3. Changer une sonde implique de purger le circuit de refroidissement. Sur mon modèle il faut 5.5 litres de liquide de refroidissement. Vous n'aurez pas besoin d'outil spécifique pour la purge, simplement d'un bac pour récupérer le liquide usagé et d'une bouteille en plastique (1.5L ou 2L) qui servira lors du remplissage.
-
-
Soulevez le capot.
-
La sonde est située sur le boitier de thermostat.
-
Retirer le boîtier du filtre à air n'est pas obligatoire mais ça facilite le démontage de la sonde.
-
Débranchez la borne négative de la batterie.
-
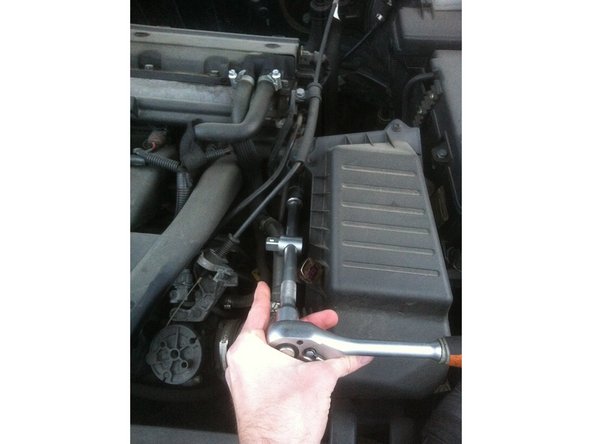
Desserrez les 2 colliers de serrage et l'écrou situé derrière.
-
Retirez le boîtier du filtre à air.
-
-
-
Cette manipulation doit se faire moteur froid.
-
Ouvrez le bouchon de remplissage du circuit de refroidissement.
-
Repérez le bouchon de purge en bas du circuit.
-
-
-
Les vis de purge se situent sur le boitier du thermostat, sur une des durites qui vont au radiateur de chauffage et sur le haut du radiateur à côté de l'admission d'air.
-
Placez le bac de vidange sous le bouchon de vidange.
-
Vidangez en ouvrant le bouchon de vidange d'un quart de tour.
-
Ouvrez les vis de purge pour purger entièrement le circuit.
-
-
-
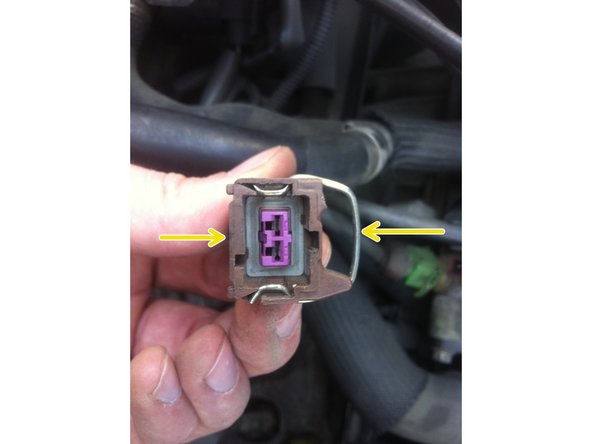
Pour le débrancher il suffit d'exercer une pression sur l'agrafe qui maintient le connecteur sur la sonde.
-
-
-
Dévissez la sonde défectueuse et et remplacez-la par la neuve.
-
Rebranchez le connecteur électrique.
-
-
-
Puisque les purgeurs sont situés plus haut que le niveau max du réservoir il faut prendre une bouteille en plastique, couper le fond et l'introduire dans l'orifice du réservoir.
-
Assurez-vous qu'une fois la bouteille dans le réservoir il n'y ait pas de fuite.
-
Remplissez le réservoir et la bouteille jusqu'à ce que le niveau du liquide soit plus haut que le purgeur le plus haut. Vous devriez voir les bulles d'air s'échapper par la bouteille et les purgeurs.
-
Etant donné que le vase d'expansion sera plein du liquide va s'écouler par le trop-plein sous l'antibrouillard avant droit, n'oubliez pas de placer le bac de vidange à cet endroit contre la roue.
-
Dès que le liquide s'écoule en continu sur un purgeur, fermez-le.
-
Démarrez le moteur pour faire s'échapper les dernières bulles d'air et pour faire s'ouvrir le thermostat. Le niveau va baisser, complétez au fur et à mesure jusqu'à ce qu'il n'y ait plus de bulles d'air.
-
Retirez la bouteille et fermez avec le bouchon.
-
Laissez la température monter jusqu'au déclenchement du ventilateur. Attendre l'arrêt du ventilateur puis attendre que le moteur refroidisse. Quand le moteur est froid vérifiez le niveau et faites l'appoint ou retirez l'excédant.
-


Pensez à prendre du liquide de refroidissement spécifique Peugeot et en quantité suffisante (2x4 litres)
Pensez à prendre du liquide de refroidissement spécifique Peugeot et en quantité suffisante (2x4 litres)
Annulation : je n'ai pas terminé ce tutoriel.
3 autres ont terminé cette réparation.