


-
-
Commencez par débrancher la cosse négative de votre batterie
-
Dévissez les 6 vis puis retirez le filtre.
-
-
-
Il faut extraire le capteur AUC en le faisant tourner d'1/4 de tour (carré vert).
-
On retire ensuite le câble (trait jaune) en tirant dessus, il est fixé par 3 agrafes (carré bleu).
-
On dévisse maintenant les 2 vis (entourées en rouge) qui maintiennent le tablier.
-
Sortir le tablier en tirant dessus.
-
-
-
On retire le joint.
-
On retire le cache de la vis supérieure . Il faut une douille torx E18 pour la vis.
-
On retire les 2 autres vis torx. Il faut une douille torx E16.
-
On peut retirer les 2 barres anti-rapprochement en tirant dessus.
-
-
-
On commence par retirer la chape en dévissant les 3 vis puis on l'enlève.
-
On retire le cache acoustique en dévissant les 2 vis puis on l'enlève.
-
-
-
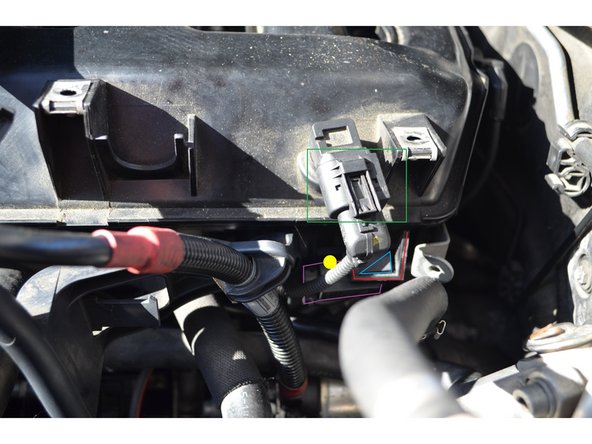
Débranchez le palpeur de pression.
-
Il faut maintenant retirer le convertisseur de pression du collecteur d'admission. Le convertisseur de pression (entouré en mauve) est fixé sur l'agrafe du collecteur (en rouge). Il suffit de poussé la petite patte de fixation (en bleu).
-
Un petit tuyau de dépression est relié au convertisseur de pression ET au collecteur, il faut donc l'extraire au niveau du convertisseur (en jaune).
Défaire le convertisseur (mauve) a été le point noir de l’étape 6 en ce qui me concerne. Pour bien le défixer, Il faut soulever légèrement la patte de fixation (bleu) par la droite. Pour cela passer la main (côté habitacle) et vous y arrivez avec un doigt, ensuite pousser le capteur de la droite (côté habitacle) vers la gauche (côté pare-chocs). Il se libérera en faisant “clic“.
christophe delouis - Résolu à la publication Réponse
Oui tout à fait. J ai créé un compte pour mettre mes commentaires. J aurais gagné du temps si je l avais fait avant et que j avais vu votre commentaire !
hessjee -
-
-
-
On retire le tuyau de dépression.
-
On débranche le boîtier de connection.
-
On retire l'agrafe de la gaine électrique.
-
On retire l'agrafe qui retient la durite puis on sort la durite. Sur la photo la durite est déjà déboîtée.
-
-
-
On dévisse les 12 vis avec une douille de 10.
-
On dévisse les 7 écrous avec une douille de 11.
-
On retire le collecteur.
-
-
-
Il y a en un par bougie, il faut appuyer de chaque côté de la tête du faisceau puis tirer vers le haut pour le sortir de la bougie.
-
On dévisse ensuite chaque bougie avec une longue douille de 10.
On peut ici changer le relai de prechauffage qui se situe à peu pres au milieu du bloc en dessous de la 3e bougies a peu près et bien caché. Accessible avec une douille de 10 et une rallonge. Un peu difficile de debrancher les deux fiches car il n y a pas beaucoup de place mais realisable pour ceux qui sont arrivés à cette etape sans encombre. Je conseille de le changer sur ce modele pour eviter de nouveaux problemes avec les bougies.
1 chtite erreur de photo (N°3) pour la devisse, c’est l’intérieur D du coffre ...
Par ailleurs tant qu’on y est, vu la MO pour y accéder changer le boitier de temporisation qui commande ces bougies et est dessous de celles-ci et au dessus du démarreur 1 peu en avant, tenu par 2 écrous et 2 fiches électriques clipsées, car il peut générer des erreurs à lui seul, prix 60 Euros, respecter la Ref OEM. 1 peu de WD-40 pour dévisser les bougies si ça coince et montré sur la photo 1. Super idée ces tutos, merci.
Henri BOULET - Résolu à la publication Réponse
-
-
-
Pour remonter les bougies on peut appliquer un peu de graisse au cuivre sur le filetage.
-
Tout le reste s'effectue en sens inverse du démontage.
-


Annulation : je n'ai pas terminé ce tutoriel.
11 autres ont terminé cette réparation.
21 commentaires
Bonjour, je suis bloqué à l’étape 5 je n’arrive pas à retirer la chape j’ai dévisser mais après il faut tirer fort ? Avez vous une technique ça sort pas chez moi :-(
merci
valery kalombo - Résolu à la publication Réponse
En fait pour retirer le pommeau il faut se mettre en drive avant, pour le remettre, pas d’importance.
Henri BOULET - Résolu à la publication Réponse
Bonjour Laurent,
En fait il est juste collé. Il suffit de tirer vers le haut comme on arracherait une grosse carotte!
Avec le pommeau, une tige en plastique de 15 cm vient avec. Cela n’avait l’air solide mais la pose n’a pas pose de soucis.
@+
Pour info, jvais passer de la 525d à la 525xi :)
Christophe
christophe delouis - Résolu à la publication Réponse
Bonjour Christophe,
Je n’ai jamais démonter le pommeau, désolé.
Cordialement
Laurent
laurent.immo13003 - Résolu à la publication Réponse
Bonjour Laurent,
Pour info jai réussi à facilement démonter le ciel de toit grace aux conseilles de mon carossier avisé. Mais en fait le problème ne venait pas d’en haut mais d’en bas : les sorties (situées dans le parechocs arriere) étaient obstruées par plein de saletés et les tuyaux en charge refoulaient l’eau par le haut. Tout cela pour ça!
Sinon, autre chose avez vous déjà démonter le pommeau de la boite vitesse automatique? Ma gachette n’est plus ferme et j’aimerai savoir pourquoi
@+
Christophe
christophe delouis - Résolu à la publication Réponse
Vous avez pas changer la boite préchauffage ?
Est ce que c est obligatoire de le changer avec les bougies , si oui ou je peux le trouver exactement.
Bon boulot , je vous remercie beaucoup d avance
anis elichaoui - Résolu à la publication Réponse
realoem.com? Je ne connaissait pas mais à priori il y a l’éclaté du TO mais pas des habitacles interieurs.
christophe delouis - Résolu à la publication Réponse
Bonjour Christophe,
Désolé j’en ai pas. Peut-être que les éclatés sur realoem.com vous aideraient.
laurent.immo13003 - Résolu à la publication Réponse
Bonjour Laurent,
Bmw a fixé l’habitacle des E61 comme celui des E9. Donc démontage réussi grace à votre image. Mais malheureusement ce n’est pas à cet endroit que l’eau s’échappe mais dans le toit au niveau de l’encoche filet de coffer (juste au dessus de l’appui tête ArDt) Je suis bon pour démonter l’habitacle du toit. Si vous avez des bonnes astuces pour faire cela je suis preneur .
Bonne journée à vous
christophe delouis - Résolu à la publication Réponse
Bonjour Laurent,
Et bien tant mieux pour vous, car l’eau sur la batterie je vous raconte pas les emm….d’autant plus ils n’apparaissent de suite après la pluie mais plusieurs jours après, le diagnostique a été d’autant plus difficile.
Bon je vais tacher de réussi à démonter l’habitacle pour déboucher ou réparer ce foutu tuyau d’évacuation. A suivre donc….
christophe delouis - Résolu à la publication Réponse
Bonjour Christophe,
Jamais eu ce souci puisque je n’ai pas le TO sur ma voiture.
Bonne journéee
laurent.immo13003 - Résolu à la publication Réponse
Bonjour Laurent,
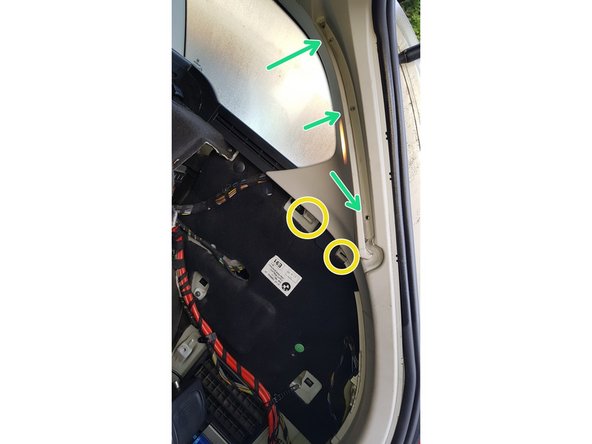
Super l’idée de la photo. Oui cest bien ce montant, et je comprends qu’il y a 3 autres visses (fleches vertes) que je n’avais pas vu.
Merci du conseil .
Vous avez déjà eu ce soucis d’évacuation du TO?
bonne journée.
christophe delouis - Résolu à la publication Réponse
Bonjour Christophe,
Je ne comprends pas bien de quel montant vous parlez (le boîtier à fusibles m’embrouille). J’ai ajouté une photo à l’étape 9 sur laquelle vous verrez les fixations du montant arrière droit de ma voiture.
Cordialement
laurent.immo13003 - Résolu à la publication Réponse
Bonjour Laurent,
Rien à voir avec les bougies, une des 4 évacuations de mon toit ouvrant pose problem et pas des moindre celle du coté arriere droit car l’eau revient à l’interieur au dessus du boitier à fusibles et tombe sur la batterie! je n’arrive pas à démonter l’habitacle de ce montant arriere droit. Mise à part défaire les 2 visses au dessus du boitier à fusibles, auriez vous des conseils svp ?
Merci et bonne fin de semaine
christophe delouis - Résolu à la publication Réponse
Bonjour à vous,
pour les bougies Bosch cest 18 Nm
pour les vis M6 de l’EGR cest 10 Nm
pour les ecrous M7 de la culasse cest 15 Nm
pour les vis M6 de la culasse cest 10 Nm
Attention certaines clés dynamométriques sont en Kilo et d’autres en Nm (10 Nm =1Kilo!)
Bon courage Arnaud…
Christophe
christophe delouis - Résolu à la publication Réponse
Bonjours, super tuto, par contre pour le remontage, aurais tu les couples de serrages???????
merci par avance !!!
Arnaud Lapeyre - Résolu à la publication Réponse
Bonjour Mr Grandin,
Oui il fallait bien passer la main sur le coté droit pour la soulever et la défixer.
C’était trop bon d’entendre “clic” et voir enfin le convertisseur se libérer “zou”.
Sans cette précision je n’aurai jamais pu aller au bout du tuto et donc de la réparation.
PS : Sur les 6 bougies, 2 devaient être HS car elles étaient pleines d’huile noires contrairement aux 4 autres.
Bilan : Elle a tres bien redémarré mais avec un gros nuage de fumée et surtout la cosommation est passée de 7.6 à 6.6 L/100 (AR larochelle/Angers)!
Mécaniquement votre, Christophe (525d-E61)
christophe delouis - Résolu à la publication Réponse
Il faut soulever légèrement la patte de fixation par la droite (côté habitacle). Cette fixation est très fragile et risque d’être cassée si vous forcez trop. Soit vous y arrivez avec le doigt soit avec un petit tournevis, ensuite il faut faire glisser le capteur de la droite (côté habitacle) vers la gauche (côté pare-chocs).
laurent.immo13003 - Résolu à la publication Réponse
Bonsoir Mr Grandin,
Super votre tuto vraiment, cela dit je suis bloqué à l’étape 6 : retirer le convertisseur de pression du collecteur d'admission.
Ok mais je n’arrive pas à le dé-fixer de l'agrafe du collecteur (en rouge). La petite patte de fixation (en bleu), il faut la pousser comment svp? vers le haut? vers la gauche?
Merci d’avance de votre aide car demain il faudrait que je termine.
Mr Delouis Christophe (La Rochelle)
06.52.12.60.49 ou xtophe70@gmail.com
christophe delouis - Résolu à la publication Réponse