


Difficulté
Facile
Étapes
11
Temps nécessaire
00:45:00

Ce tutoriel a été créé par la communauté
User contributed
Introduction
La sonde lambda joue un rôle majeur dans le système d'injection. Elle a un impact direct sur la consommation et les émissions de gaz à l'échappement.
Parts
-
-
la sonde lambda se situe à l'avant du moteur
-
elle est vissée sur le tuyau d'échappement, sous le collecteur
-
-
-
Cette étape n'est pas forcément obligatoire mais le démontage est très rapide et on sera plus à l'aise pour travailler.
-
retirer le tuyau d'air chaud (il est flexible)
-
dévisser les 3 vis de la tôle sur le collecteur, clé de 10mm (on peut appliquer du dégrippant en avance)
-
retirer la tôle, la sonde est un peu plus accessible
-
-
-
dévisser les deux vis qui tiennent le manchon d'air, clé de 10mm
-
pour écarter la prise d'air, il faudra aussi défaire l'ergot en plastique de son logement (rectangle rouge).
-
écarter le câble d'accélérateur après l'avoir retiré des 2 clips en plastique qui le tiennent en place
-
et dévisser le collier de serrage du manchon d'air, clé de 7mm
-
-
-
on peut maintenant faire basculer tout l'ensemble
-
la prise de la sonde lambda est maintenant accessible
-
La pièce indiquée par la flèche jaune fait partie du système GPL de la voiture. Elle rend l'accès à la prise plus difficile. Vous aurez donc beaucoup plus de place sur une 106 essence conventionnelle.
-
-
-
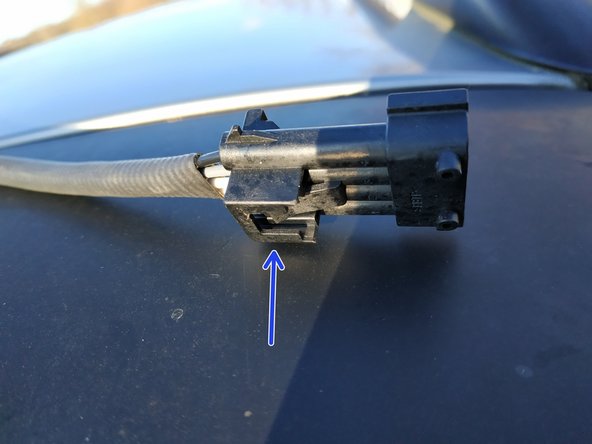
la prise est verrouillée par la languette rouge
-
il va falloir écarter cette languette rouge vers l'extérieur pour libérer la sonde
-
la sonde est fixée sur la voiture via un système d'agrafe ; il va falloir faire levier avec un petit tournevis plat et tirer délicatement vers soi pour la libérer
-
Sur ce véhicule, l'agrafe était cassée. Je ne l'ai pas remplacée car la prise ne risque rien là où elle se trouve. Il y a très peu de contrainte. On peut remplacer l'agrafe (c'est le mieux), fixer la prise avec un collier en plastique si on le souhaite ou la laisser comme ça.
-
-
-
libérer la connectique de la sonde
-
débloquer la sonde à l'aide d'une clé plate de 22mm
-
finir de dévisser à la main et retirer la sonde
-
-
-
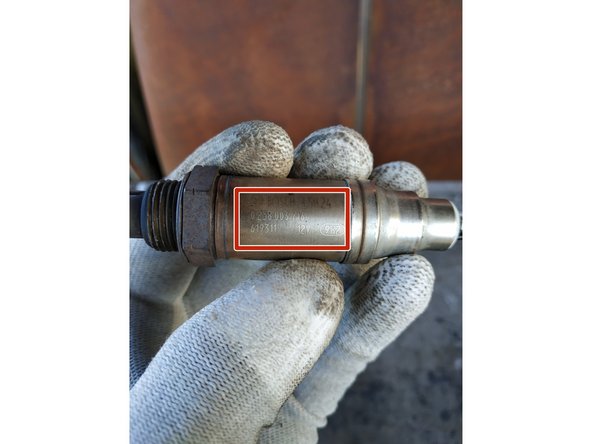
relever la référence sur la sonde d'origine
-
et choisir une référence équivalente
-
J'ai pris exactement la même marque mais ce n'est pas une obligation. Il existe plusieurs manufacturiers, il suffit juste de prendre une sonde équivalente.
-
-
-
on n'enlèvera le capuchon de protection qu'au dernier moment, juste avant de monter la sonde
-
visser la sonde à la main en faisant attention de ne pas abîmer son extrémité
-
finir le serrage à l'aide de la clé plate de 22mm
-
Il faut que la sonde soit bien serrée.
-
-
-
il y a un détrompeur sur la prise donc aucun risque de ne pas brancher correctement
-
mettre en place la prise de la sonde (après l'avoir faite passer sous les différentes durites) et la clipser sur l'agrafe si votre voiture en est toujours équipée
-
On doit entendre un "clic".
-
brancher et verrouiller en appuyant sur la languette rouge
-
-
-
faire basculer le manchon d'air et bien le remettre en place
-
visser le collier de serrage à l'aide de la clé de 7mm et les 2 vis à l'aide de la clé de 10mm
-
Attention de bien remettre l'ergot en place (rectangle jaune).
-
remettre le câble d'accélérateur à sa place
-
-
-
mettre en place la tôle sur le collecteur et visser les 3 vis de fixation à l'aide de la clé de 10mm
-
remettre le tuyau d'air chaud en place
-


Annulation : je n'ai pas terminé ce tutoriel.
Une autre personne a terminé cette réparation.